· 4 min read
wen

1. Slice 是什么?

Slice 是 Go 语言中的一种类似数组的数据结构,是对数组的一个封装。

和数组相比,slice 的长度是可以动态变化的,可以通过内置函数 append 来动态增加切片的长度。

img

2. Slice 的注意事项和常见错误以及陷阱

2.1. 未初始化的切片

未初始化的切片是 nil,对其进行操作会导致运行时错误。

package main

import "fmt"

func main() {
var fruits []string
// fruits[0] = "🍎" // 这会导致运行时错误:panic: runtime error: index out of range [0] with length 0

// 正确做法1:初始化切片
fruits := make([]string, 1)
fruits[0] = "🍎"

// 正确做法2:使用字面量初始化切片
fruits := []string{"🍎"}

// 正确做法3:使用 append 函数初始化切片。(如果不是特别注重性能,这种方式是最简单的。)
fruits = append(fruits, "🍎")
}

2.2. 使用 append 函数时,注意重新赋值

append 函数会在容量不足时重新分配一个更大的底层数组,并将原来的数据复制到新的数组中,然后返回一个新的切片,

所以注意在使用 append 函数时,如果需要使用原来的切片变量,就需要重新赋值。

    fruits := []string{"🍎"}
fruits = append(fruits, "🍌")

2.3. 切片作为函数参数时的引用问题

切片是引用类型,所以在函数参数中传递切片时,实际上是传递了切片的引用。

func modifyFruits(fruits []string) {
fruits[0] = "🍌"
}

func main() {
fruits := []string{"🍎", "🍌"}
fmt.Println("Before modification:", fruits) // 输出: Before modification: [🍎 🍌]

modifyFruits(fruits)
fmt.Println("After modification:", fruits) // 输出: After modification: [🍌 🍌]
}

2.4. 切片的截取

切片的截取操作是左闭右开的,即 a[1:3] 表示从下标 1 开始到下标 3 结束,但不包括下标 3。

    fruits := []string{"🍎", "🍌", "🍇", "🍉"}
fmt.Println(fruits[1:3]) // 输出: [🍌 🍇]

2.5. 切片的长度和容量混淆

切片的长度是指切片中元素的个数,容量是指切片底层数组的长度。

    fruits := make([]string, 2, 5)
fmt.Println("Length:", len(fruits), "Capacity:", cap(fruits)) // 输出: Length: 2 Capacity: 5

// fruits[3] = "🍇" // 这会导致运行时错误:panic: runtime error: index out of range [3] with length 2

// 正确做法:使用 append 来添加元素
fruits = append(fruits, "🍇")

2.6. 切片的复制

切片的复制是浅拷贝,即复制的是切片的引用,而不是切片的底层数组。

这个和函数参数传递的引用是类似的。

    fruits := []string{"🍎", "🍌"}
fruitsCopy := fruits
fruitsCopy[0] = "🍌"
fmt.Println("Original slice:", fruits) // 输出: Original slice: [🍌 🍌]

· 3 min read
wen

在 Go (Golang) 编程中,map 是一种强大且灵活的数据结构,用于存储键值对。

然而,为了确保高效和正确的使用,有几个重要的点需要注意。

本文将详细介绍这些关键考虑因素,并通过示例代码展示如何在 Go 中有效地使用 map。

1. 初始化

在使用 map 之前,必须对其进行初始化。可以使用 make 函数或使用 map 字面量来初始化。

// 使用 make
m := make(map[string]int)

// 使用 map 字面量
m := map[string]int{"🍎": 1, "🍌": 2}

2. Nil Map

nil map空 map 不同。

nil map 不能写入,尝试写入会导致运行时恐慌(panic)。

因此,始终要初始化你的 map。

var m map[string]int // m 是 nil
m["🍎"] = 1 // 这会导致恐慌

3. 从 Map 中读取

从 map 中读取时,如果键不存在,会返回值类型的零值。为了区分缺失的键和实际的零值, 可以使用多返回值的方式。

value, ok := m["🍊"]
if ok {
fmt.Println("找到了:", value)
} else {
fmt.Println("未找到")
}

4. 从 Map 中删除

使用 delete 函数从 map 中移除键值对。在键不存在的情况下调用 delete 是安全的。

delete(m, "🍎")

5. 并发访问

Map 不是并发安全的。如果多个 goroutine 同时访问一个 map,并且至少有一个修改了 map,你必须使用互斥锁或通道来同步访问。

var mu sync.Mutex

mu.Lock()
m["🍎"] = 1
mu.Unlock()

6. 迭代顺序

map 的迭代顺序不能保证在程序的不同运行中保持一致。如果你需要稳定的迭代顺序,必须显式地对键进行排序。

keys := make([]string, 0, len(m))
for k := range m {
keys = append(keys, k)
}
sort.Strings(keys)
for _, k := range keys {
fmt.Println(k, m[k])
}

7. 作为 set 使用

Golang 中没有 set 类型,但可以使用 map 来模拟 set 。只需将值类型设置为 struct{} 即可。

struct{} 是一个空结构,不占用任何内存空间。这样可以节省内存,因为 map 的值是空结构,而不是实际的值。

s := make(map[string]struct{})
s["🍎"] = struct{}{}

// 检查键是否存在
_, ok := s["🍎"]

如果觉得麻烦,可以直接使用第三方库 golang-set

· One min read
wen

需求

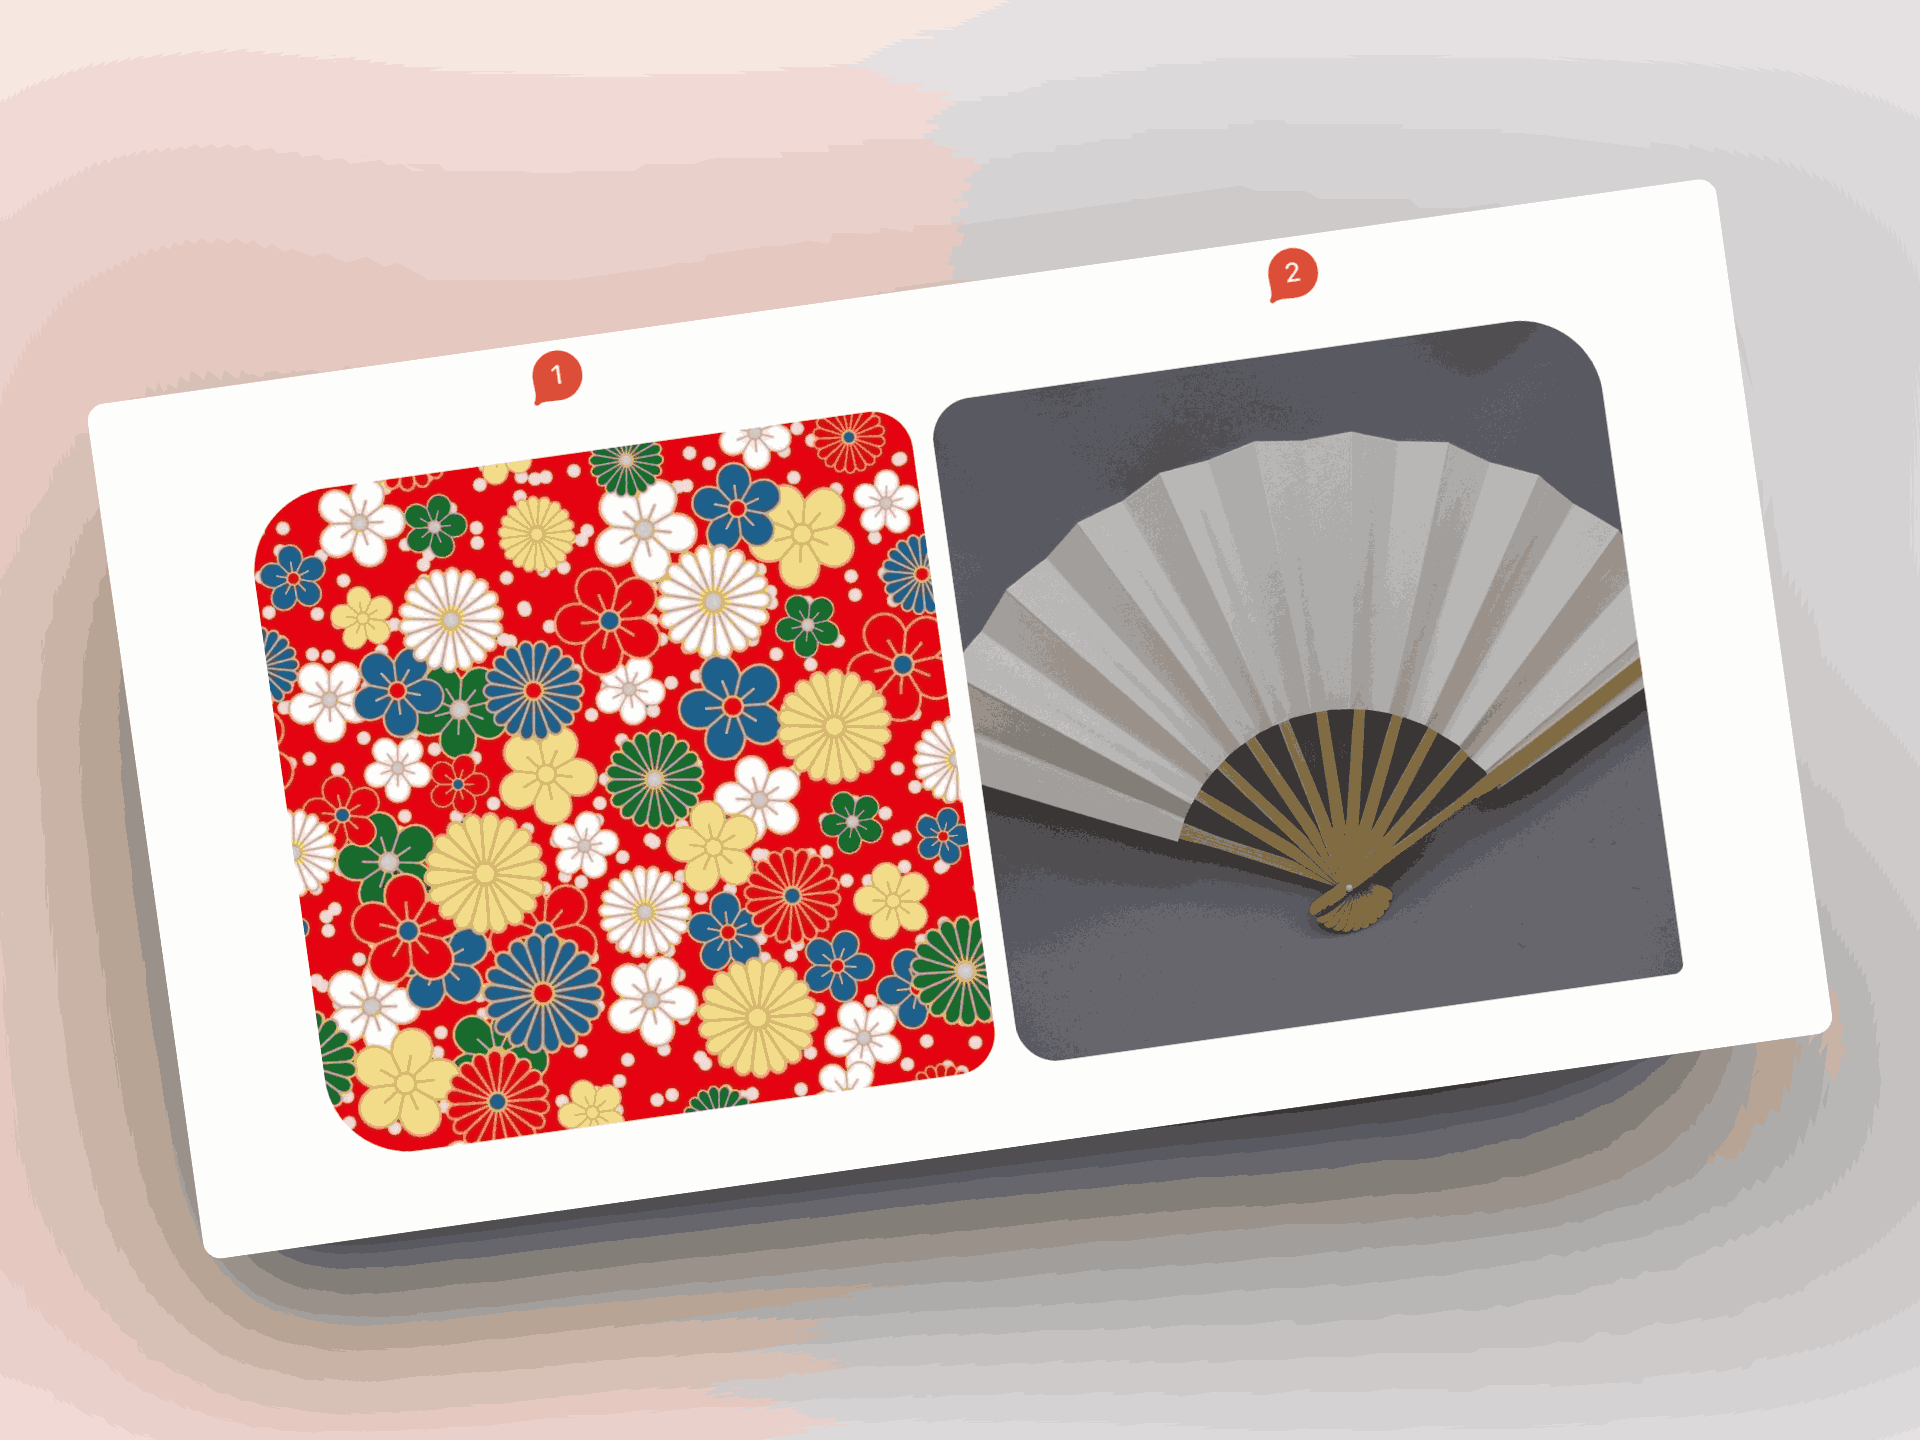
把花纹填充到图片中可以让您的图片更具艺术感和创意。

在这篇文章中,我们将介绍如何使用 ChatGPT 来为图片添加花纹和纹理。

比如把下面的花纹填充到扇子图片中:

img

步骤

1. 打开 ChatGPT, 在输入框中上传图片。并输入 @DALL・E (一个 ChatGPT 的用于生成图片的插件)选中后,输入以下文本:

把图 1 的花纹图片填入图 2 中的扇子中。

img

2. 点击“生成”按钮,等待 ChatGPT 生成结果。

img

补充

如果不选择 @DALL・E 直接使用 ChatGPT 也可以,但效果好像不如 @DALL・E

下面是不选择 @DALL・E 的效果:

img

· 2 min read
wen

背景

使用 ChatGPT 生成带有中文的图片的图片时,中文会出现乱码的问题。本教程将介绍如何解决这个问题。

比如,我让 ChatGPT 生成一个带有中文的图片,输入如下:

请生成一张猫的照片,并在照片上加上中文字 “猫咪”

生成的图片如下:

img

步骤

1. 下载中文字体,比如有名的 Noto Serif SC

下载地址:Noto Serif SC

如果你想显示日语韩语等其他语言,可以下载 Noto Serif CJK 字体。

下载解压后会得到以下几个像 NotoSerifSC-xxx.otf 这样的字体文件。

xxx 部分表示的是字体的粗细,可以根据自己的需要选择。

这次我们用的是 NotoSerifSC-Regular.otf

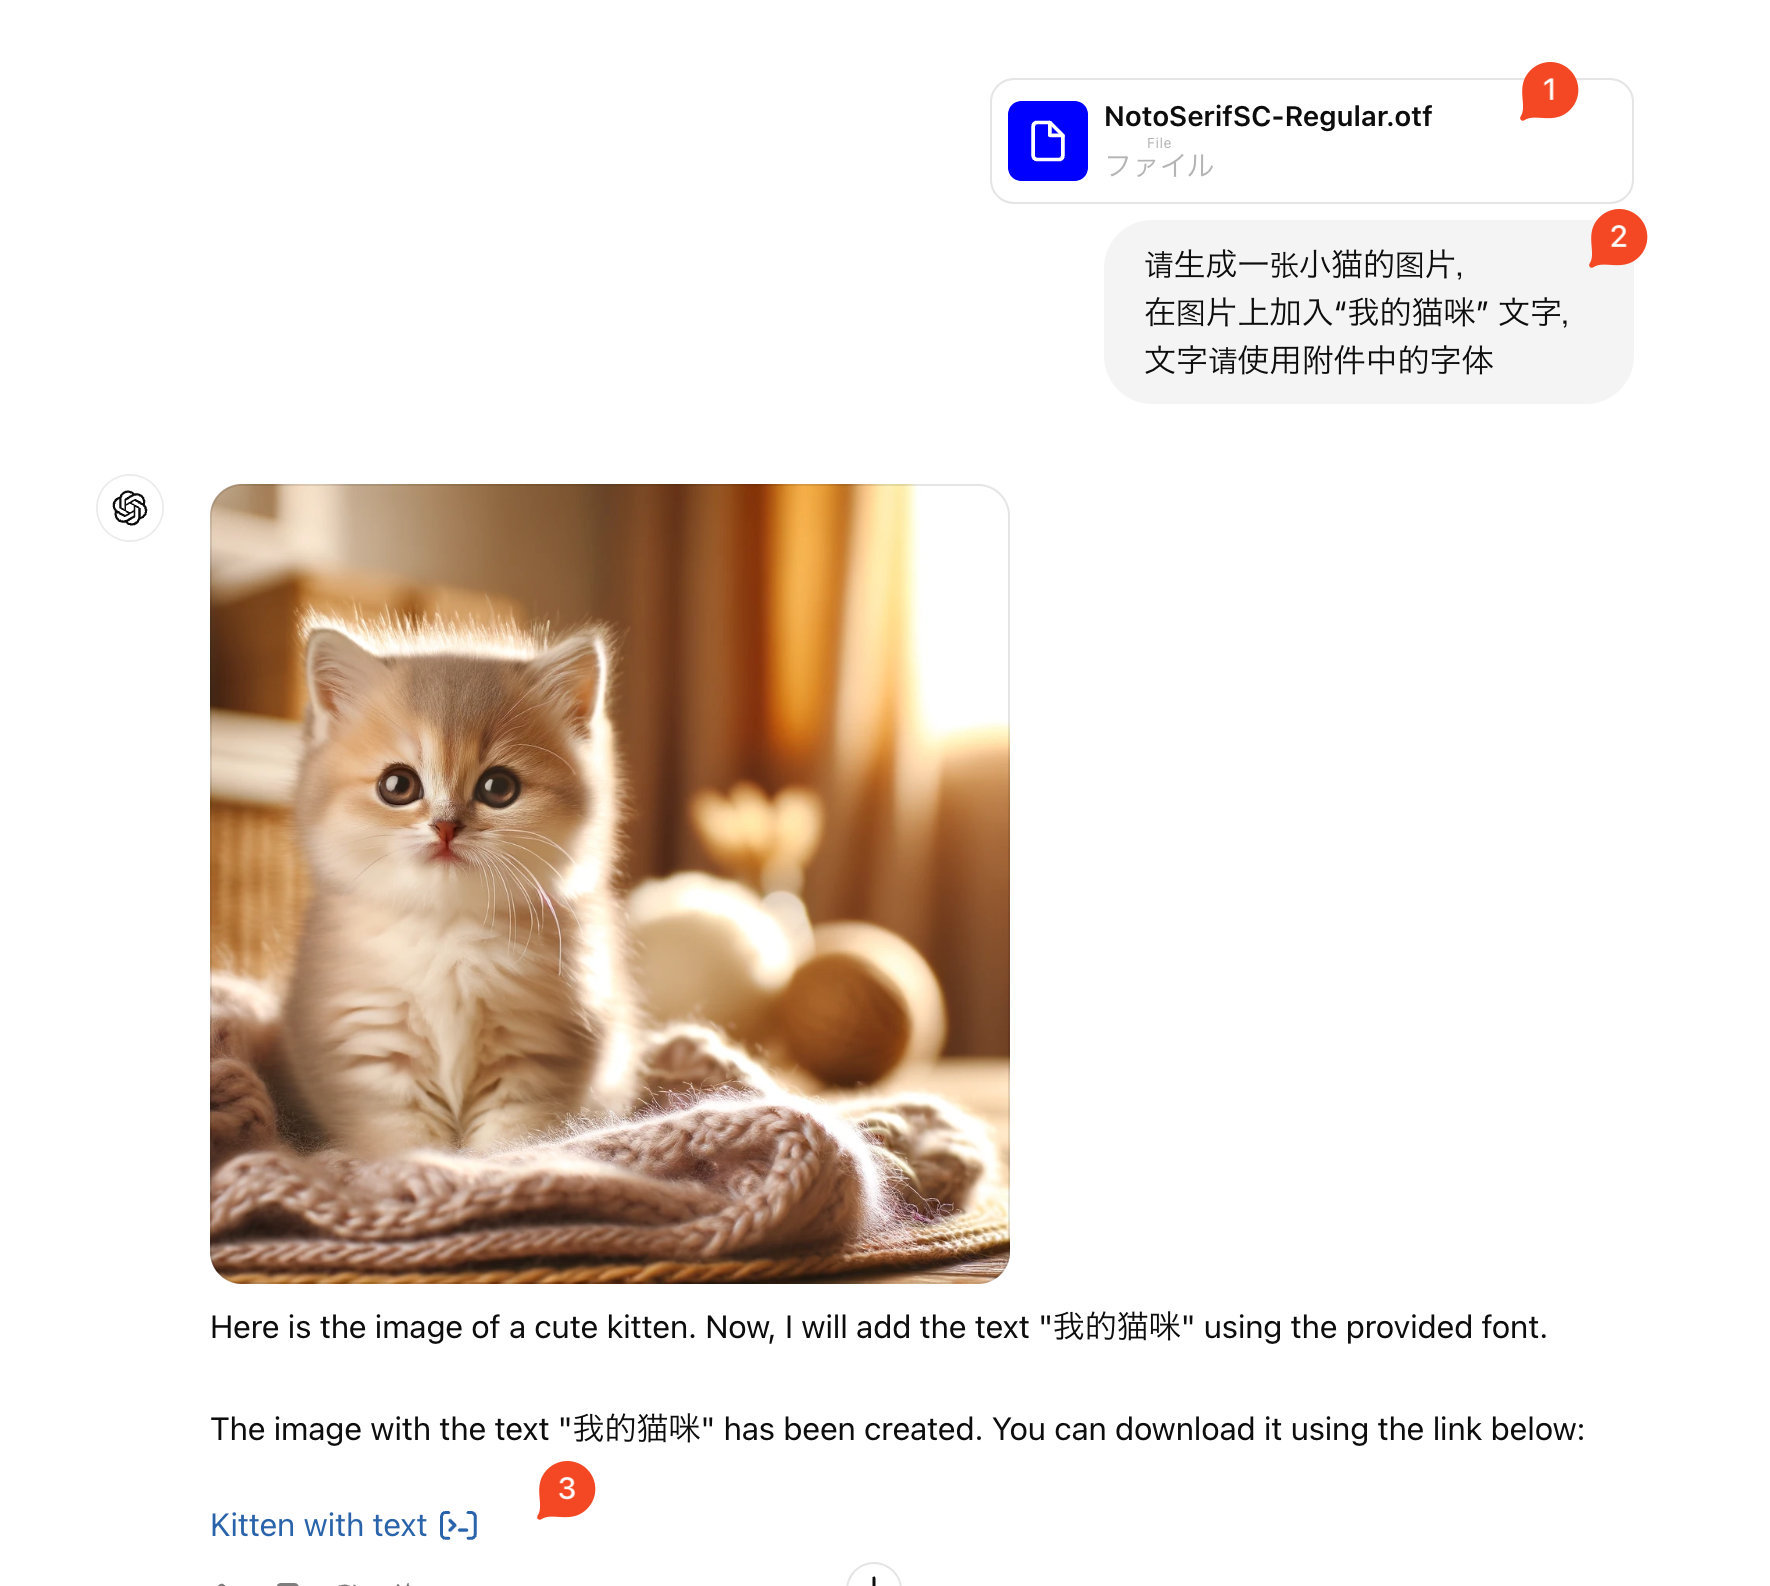
2. 打开 ChatGPT,上传字体文件,输入你的 prompt

请生成一张猫的图片
在图片上加入“我的猫咪” 字样
请使用附件中的字体。

img

点击 3️⃣ 下载图片。

3. 生成图片

img

4. 扩展

上面生成的图片,没有指定文字的位置和颜色。现在默认好像是用黑色并显示在图片的底部中间。

如果你想指定文字的位置和颜色,可以在 prompt 中加入更多的信息。

比如:

请生成一张小猫的图片,
在图片上的左上角加入“我的猫咪” 文字,文字颜色用白色
文字请使用附件中的字体

生成的图片就会是这样:

img

· 2 min read
wen

前言

Docusaurus 是一个由 Facebook 开发的开源项目,用于构建静态网站。

它是一个基于 React 的静态网站生成器,可以帮助您快速创建网站。

Docusaurus 还提供了一个易于使用的博客插件,可以帮助您创建博客。

Docusaurus 默认不提供 RSS 导航菜单,在本文中,我们将介绍如何为 Docusaurus 博客添加 RSS 导航菜单。

怎么给 Docusaurus 博客 添加 RSS 导航菜单

docusaurus.config.js
module.exports = {
...
themeConfig: {
...
navbar: {
items: [
// blog rss
{
href: '/blog/rss.xml',
label: 'RSS',
position: 'right',
target: '_blank', // Open the link in a new tab/window
},
],
...

补充说明

BTW, 如果用 to 选项的话,点击 RSS 链接会报页面无法找到的 404 错误,

因为 Docusaurus 会把 to 选项的值当作一个页面的路径,而不是一个链接。

docusaurus.config.js
module.exports = {
...
themeConfig: {
...
navbar: {
items: [
// blog rss
{
to: '/blog/rss.xml',
label: 'RSS',
position: 'right',
},
],
...

· 2 min read
wen

问题

有 2 个数组,互相可能有重复的元素,如何合并这两个数组并去重?

比如有两个数组:

type User struct {
ID int // ID 作为唯一标识 (ID相同则认为是同一个元素)
Name string
}

old := []User{
{ID: 1, Name: "a"}, // only in old
{ID: 2, Name: "b"}, // 重复
}

new := []User{
{ID: 2, Name: "c"}, // 重复
{ID: 3, Name: "d"}, // only in new
}

合并后的结果应该是:

c := []User{
{ID: 1, Name: "a"}, // only in old
{ID: 2, Name: "c"}, // 重复 (保留 new 中的)
{ID: 3, Name: "d"}, // only in new
}

解决方案(一般化)

package main

import "fmt"

type User struct {
ID int
Name string
}

// contains Check if an element exists in a slice.
// keyFunc is used to uniquely identify the elements.
func contains(slice []any, item any, keyFunc func(any) any) bool {
for _, element := range slice {
if keyFunc(element) == keyFunc(item) {
return true
}
}
return false
}

// mergeSlices Merges two slices and removes duplicates.
//
// keyFunc is used to uniquely identify the elements.
// if an element exists in both old and new, the element in new takes precedence.
// old and new are assumed to have no duplicate elements.
// The order is not guaranteed.
func MergeSlices(old, new []any, keyFunc func(any) any) []any {
var merged []any

// copy new to merged
merged = append(merged, new...)

for _, item := range old {
if !contains(merged, item, keyFunc) {
merged = append(merged, item)
}
}

return merged
}

func main() {
old := []any{
User{ID: 1, Name: "a"},
User{ID: 2, Name: "b"}, // 重複
}
new := []any{
User{ID: 2, Name: "c"}, // 重複
User{ID: 3, Name: "d"},
}

mergedUsers := MergeSlices(old, new, func(item any) any {
return item.(User).ID
})
fmt.Printf("Merged Users:%+v", mergedUsers) // Merged Users:[ {ID:1 Name:a} {ID:2 Name:c} {ID:3 Name:d}]
}

· 3 min read
wen

背景和需求

我在写博客或者周报的时候,一般会这样管理我的分支:

  • 1). 创建带日期的分支,比如 blog/2024-01-28, weekly/2024-01-28
  • 2). 然后在这个分支上写好博客或者周报。
  • 3). 创建 PR,合并到 main 分支。
  • 4). 合并到 main 分支后,会触发 CD 自动部署。

步骤 3) 很容易忘记,所以我想通过 GitHub Actions 来自动化这个过程。

方案

创建一个 Github Actions 的 Workflow,每天定时检查分支名,

发现有当天的日期的分支 weekly/xxxx-xx-xx 的时候,自动创建 PR 并合并到 main 分支。

实现

准备工作

  1. 在 Github 中创建一个 Personal Access TokenPAT),用于创建和合并 PR。(BTW,到期时间最大只能设置 2 年) 1.1. 设置 PAT 的仓库权限: Repository accessOnly select repositories → 选择你的仓库。 1.2. 设置 PAT 的仓库访问权限: PermissionsRepository permissionsimg
  2. 在仓库中创建一个 secret,用于存放 Personal Access Token。

创建 Workflow

在仓库中创建 .github/workflows/merge-pr.yml 文件,内容如下:

name: Merge Weekly Posts Branches
on:
schedule:
- cron: "00 00 * * *"
workflow_dispatch:

jobs:
merge_weekly_branch:
runs-on: ubuntu-latest

steps:
- name: Checkout repository
uses: actions/checkout@v4

- name: Set up Git
run: |
git config --global user.email "[email protected]"
git config --global user.name "GitHub Actions"

- name: Create and merge PR
env:
GITHUB_TOKEN: ${{ secrets.GH_TOKEN }} # Personal Access Token
run: |
# Get the current date in the format 'YYYY-MM-DD'
current_date=$(date +%Y-%m-%d)

# Construct the branch name
branch_name="weekly/${current_date}"
# Fetch the branch to ensure it exists locally
git fetch origin ${branch_name}

# Check if the branch exists
if [[ -n "$(git ls-remote origin $branch_name)" ]]; then
git checkout ${branch_name}
# Create a pull request using GitHub CLI
gh pr create --base main --head $branch_name --title "weekly post PR" --body "This is a PR for weekly post changes."

# Wait for a few seconds to allow GitHub to process the PR creation
sleep 15
# Merge the pull request using GitHub CLI
gh pr merge --squash
else
echo "Weekly branch '${branch_name}' does not exist."
fi

· One min read
wen

Problem

I was trying to run a Makefile in VSCode and I got the following error:

Makefile:4: *** missing separator.  Stop.

Solution

The problem is that the Makefile is using tabs instead of spaces. To fix this, you can:

  1. Open the Makefile in VSCode
  2. Open the command palette with Ctrl + Shift + P or View > Command Palette. If you are using a Mac, you can use Cmd + Shift + P
  3. Search for Convert Indentation to Tabs

If you want to prevent this from happening in the future, you can:

  1. Open settgings in VSCode with Ctrl + , or File > Preferences > Settings. If you are using a Mac, you can use Cmd + ,
  2. Search for Insert Spaces
  3. Uncheck the box for Editor: Insert Spaces

img

· 3 min read
wen

Problem

It's a common problem to count the number of (visible) characters in a string.

In Golang, we can use utf8.RuneCountInString() function to count the number of characters in a string.

It works well for most cases, including multi-byte characters like Chinese.

Code example

package main

import (
"fmt"
"unicode/utf8"
)

func main() {
str := "abc世界"
fmt.Println(utf8.RuneCountInString(str)) // 5
}

But if the string contains emoji characters like 👉🏻, then in some cases this function will not calculate correctly.

package main

import (
"fmt"
"unicode/utf8"
)

func main() {
emojiWorld := "🌍"
fmt.Println(utf8.RuneCountInString(emojiWorld)) // 1 ✅ no problem

emojiHand := "👉"
fmt.Println(utf8.RuneCountInString(emojiHand)) // 1 ✅ no problem

emojiHandBlack := "👉🏿"
fmt.Println(utf8.RuneCountInString(emojiHandBlack)) // 2 ❌ Got 2, expected 1.

emojiOne := "1️⃣"
fmt.Println(utf8.RuneCountInString(emojiOne)) // 3 ❌ Got 3, expected 1.
}

You can copy the emoji from here emojipedia.

Why

This is because some emoji are composed of multiple unicode characters (Code Points), while the utf8.RuneCountInString() function only counts the number of unicode characters.

TermDescription
BytesThe smallest unit used to measure data storage, typically 8 bits in binary.
Code UnitsFixed-size units used in encoding schemes to represent a character. In UTF-8, a Code Unit is 8 bits, and in UTF-16, it's 16 bits.
Code PointsIn the Unicode standard, each character is assigned a unique code point, which is a numerical identifier for the character. For example, the code point for the Latin letter "A" is U+0041.
Grapheme ClustersRepresent the smallest units perceivable in a language, typically a sequence of one or more Code Points. For instance, a letter with an accent mark might be a Grapheme Cluster.

For example, 1️⃣ this emoji is composed of 3 Code Points, which are:

img

Rendered by Markdown Table

tip

Emoji Code Points can be found here emojipedia.

Solution

So we need to count the number of Grapheme Clusters instead of Code Points.

Use third-party library rivo/uniseg

package main

import (
"fmt"

"github.com/rivo/uniseg"
)

func main() {
emojiWorld := "🌍"
fmt.Println(uniseg.GraphemeClusterCount(emojiWorld)) // 1 ✅ 没有问题

emojiHand := "👉"
fmt.Println(uniseg.GraphemeClusterCount(emojiHand)) // 1 ✅ 没有问题

emojiHandBlack := "👉🏿"
fmt.Println(uniseg.GraphemeClusterCount(emojiHandBlack)) // 1 ✅ 没有问题

emojiOne := "1️⃣"
fmt.Println(uniseg.GraphemeClusterCount(emojiOne)) // 1 ✅ 没有问题
}
tip

Actually, there are not only emoji, but also some Thai and Arabic characters are composed of multiple unicode characters.

Reference

Go で文字数をカウントする 在 Go 中计算字符数

文字数をカウントする 7 つの方法

Go: Unicode と rune 型

· One min read
wen

背景

labstack/gommon 的代码中 看到了这个库 valyala/fasttemplate, 于是就去 调查了一下。

tip

labstack 是 Echo Web Framework 的 Organization。

什么是 fasttemplate

fasttemplate 是一个高效的 Go 模板引擎,比 Go 标准库的模板引擎 text/template 快很多,

而且比 strings.Replace, strings.Replacerfmt.Fprintf 都要快。

img

具体可以看一下 fasttemplate 的 benchmark

fasttemplate 的使用

基础用法

    template := "http://{{host}}/?q={{query}}&foo={{bar}}{{bar}}"
t := fasttemplate.New(template, "{{", "}}")
s := t.ExecuteString(map[string]interface{}{
"host": "google.com",
"query": url.QueryEscape("hello=world"),
"bar": "foobar",
})
fmt.Printf("%s", s)

// Output:
// http://google.com/?q=hello%3Dworld&foo=foobarfoobar

高阶用法

    template := "Hello, [user]! You won [prize]!!! [foobar]"
t, err := fasttemplate.NewTemplate(template, "[", "]")
if err != nil {
log.Fatalf("unexpected error when parsing template: %s", err)
}
s := t.ExecuteFuncString(func(w io.Writer, tag string) (int, error) {
switch tag {
case "user":
return w.Write([]byte("John"))
case "prize":
return w.Write([]byte("$100500"))
default:
return w.Write([]byte(fmt.Sprintf("[unknown tag %q]", tag)))
}
})
fmt.Printf("%s", s)

// Output:
// Hello, John! You won $100500!!! [unknown tag "foobar"]