メインコンテンツまでスキップ

· 約4分
wen

1. Slice 是什么?

Slice 是 Go 语言中的一种类似数组的数据结构,是对数组的一个封装。

和数组相比,slice 的长度是可以动态变化的,可以通过内置函数 append 来动态增加切片的长度。

img

2. Slice 的注意事项和常见错误以及陷阱

2.1. 未初始化的切片

未初始化的切片是 nil,对其进行操作会导致运行时错误。

package main

import "fmt"

func main() {
var fruits []string
// fruits[0] = "🍎" // 这会导致运行时错误:panic: runtime error: index out of range [0] with length 0

// 正确做法1:初始化切片
fruits := make([]string, 1)
fruits[0] = "🍎"

// 正确做法2:使用字面量初始化切片
fruits := []string{"🍎"}

// 正确做法3:使用 append 函数初始化切片。(如果不是特别注重性能,这种方式是最简单的。)
fruits = append(fruits, "🍎")
}

2.2. 使用 append 函数时,注意重新赋值

append 函数会在容量不足时重新分配一个更大的底层数组,并将原来的数据复制到新的数组中,然后返回一个新的切片,

所以注意在使用 append 函数时,如果需要使用原来的切片变量,就需要重新赋值。

    fruits := []string{"🍎"}
fruits = append(fruits, "🍌")

2.3. 切片作为函数参数时的引用问题

切片是引用类型,所以在函数参数中传递切片时,实际上是传递了切片的引用。

func modifyFruits(fruits []string) {
fruits[0] = "🍌"
}

func main() {
fruits := []string{"🍎", "🍌"}
fmt.Println("Before modification:", fruits) // 输出: Before modification: [🍎 🍌]

modifyFruits(fruits)
fmt.Println("After modification:", fruits) // 输出: After modification: [🍌 🍌]
}

2.4. 切片的截取

切片的截取操作是左闭右开的,即 a[1:3] 表示从下标 1 开始到下标 3 结束,但不包括下标 3。

    fruits := []string{"🍎", "🍌", "🍇", "🍉"}
fmt.Println(fruits[1:3]) // 输出: [🍌 🍇]

2.5. 切片的长度和容量混淆

切片的长度是指切片中元素的个数,容量是指切片底层数组的长度。

    fruits := make([]string, 2, 5)
fmt.Println("Length:", len(fruits), "Capacity:", cap(fruits)) // 输出: Length: 2 Capacity: 5

// fruits[3] = "🍇" // 这会导致运行时错误:panic: runtime error: index out of range [3] with length 2

// 正确做法:使用 append 来添加元素
fruits = append(fruits, "🍇")

2.6. 切片的复制

切片的复制是浅拷贝,即复制的是切片的引用,而不是切片的底层数组。

这个和函数参数传递的引用是类似的。

    fruits := []string{"🍎", "🍌"}
fruitsCopy := fruits
fruitsCopy[0] = "🍌"
fmt.Println("Original slice:", fruits) // 输出: Original slice: [🍌 🍌]

· 約3分
wen

在 Go (Golang) 编程中,map 是一种强大且灵活的数据结构,用于存储键值对。

然而,为了确保高效和正确的使用,有几个重要的点需要注意。

本文将详细介绍这些关键考虑因素,并通过示例代码展示如何在 Go 中有效地使用 map。

1. 初始化

在使用 map 之前,必须对其进行初始化。可以使用 make 函数或使用 map 字面量来初始化。

// 使用 make
m := make(map[string]int)

// 使用 map 字面量
m := map[string]int{"🍎": 1, "🍌": 2}

2. Nil Map

nil map空 map 不同。

nil map 不能写入,尝试写入会导致运行时恐慌(panic)。

因此,始终要初始化你的 map。

var m map[string]int // m 是 nil
m["🍎"] = 1 // 这会导致恐慌

3. 从 Map 中读取

从 map 中读取时,如果键不存在,会返回值类型的零值。为了区分缺失的键和实际的零值, 可以使用多返回值的方式。

value, ok := m["🍊"]
if ok {
fmt.Println("找到了:", value)
} else {
fmt.Println("未找到")
}

4. 从 Map 中删除

使用 delete 函数从 map 中移除键值对。在键不存在的情况下调用 delete 是安全的。

delete(m, "🍎")

5. 并发访问

Map 不是并发安全的。如果多个 goroutine 同时访问一个 map,并且至少有一个修改了 map,你必须使用互斥锁或通道来同步访问。

var mu sync.Mutex

mu.Lock()
m["🍎"] = 1
mu.Unlock()

6. 迭代顺序

map 的迭代顺序不能保证在程序的不同运行中保持一致。如果你需要稳定的迭代顺序,必须显式地对键进行排序。

keys := make([]string, 0, len(m))
for k := range m {
keys = append(keys, k)
}
sort.Strings(keys)
for _, k := range keys {
fmt.Println(k, m[k])
}

7. 作为 set 使用

Golang 中没有 set 类型,但可以使用 map 来模拟 set 。只需将值类型设置为 struct{} 即可。

struct{} 是一个空结构,不占用任何内存空间。这样可以节省内存,因为 map 的值是空结构,而不是实际的值。

s := make(map[string]struct{})
s["🍎"] = struct{}{}

// 检查键是否存在
_, ok := s["🍎"]

如果觉得麻烦,可以直接使用第三方库 golang-set

· 約1分
wen

需求

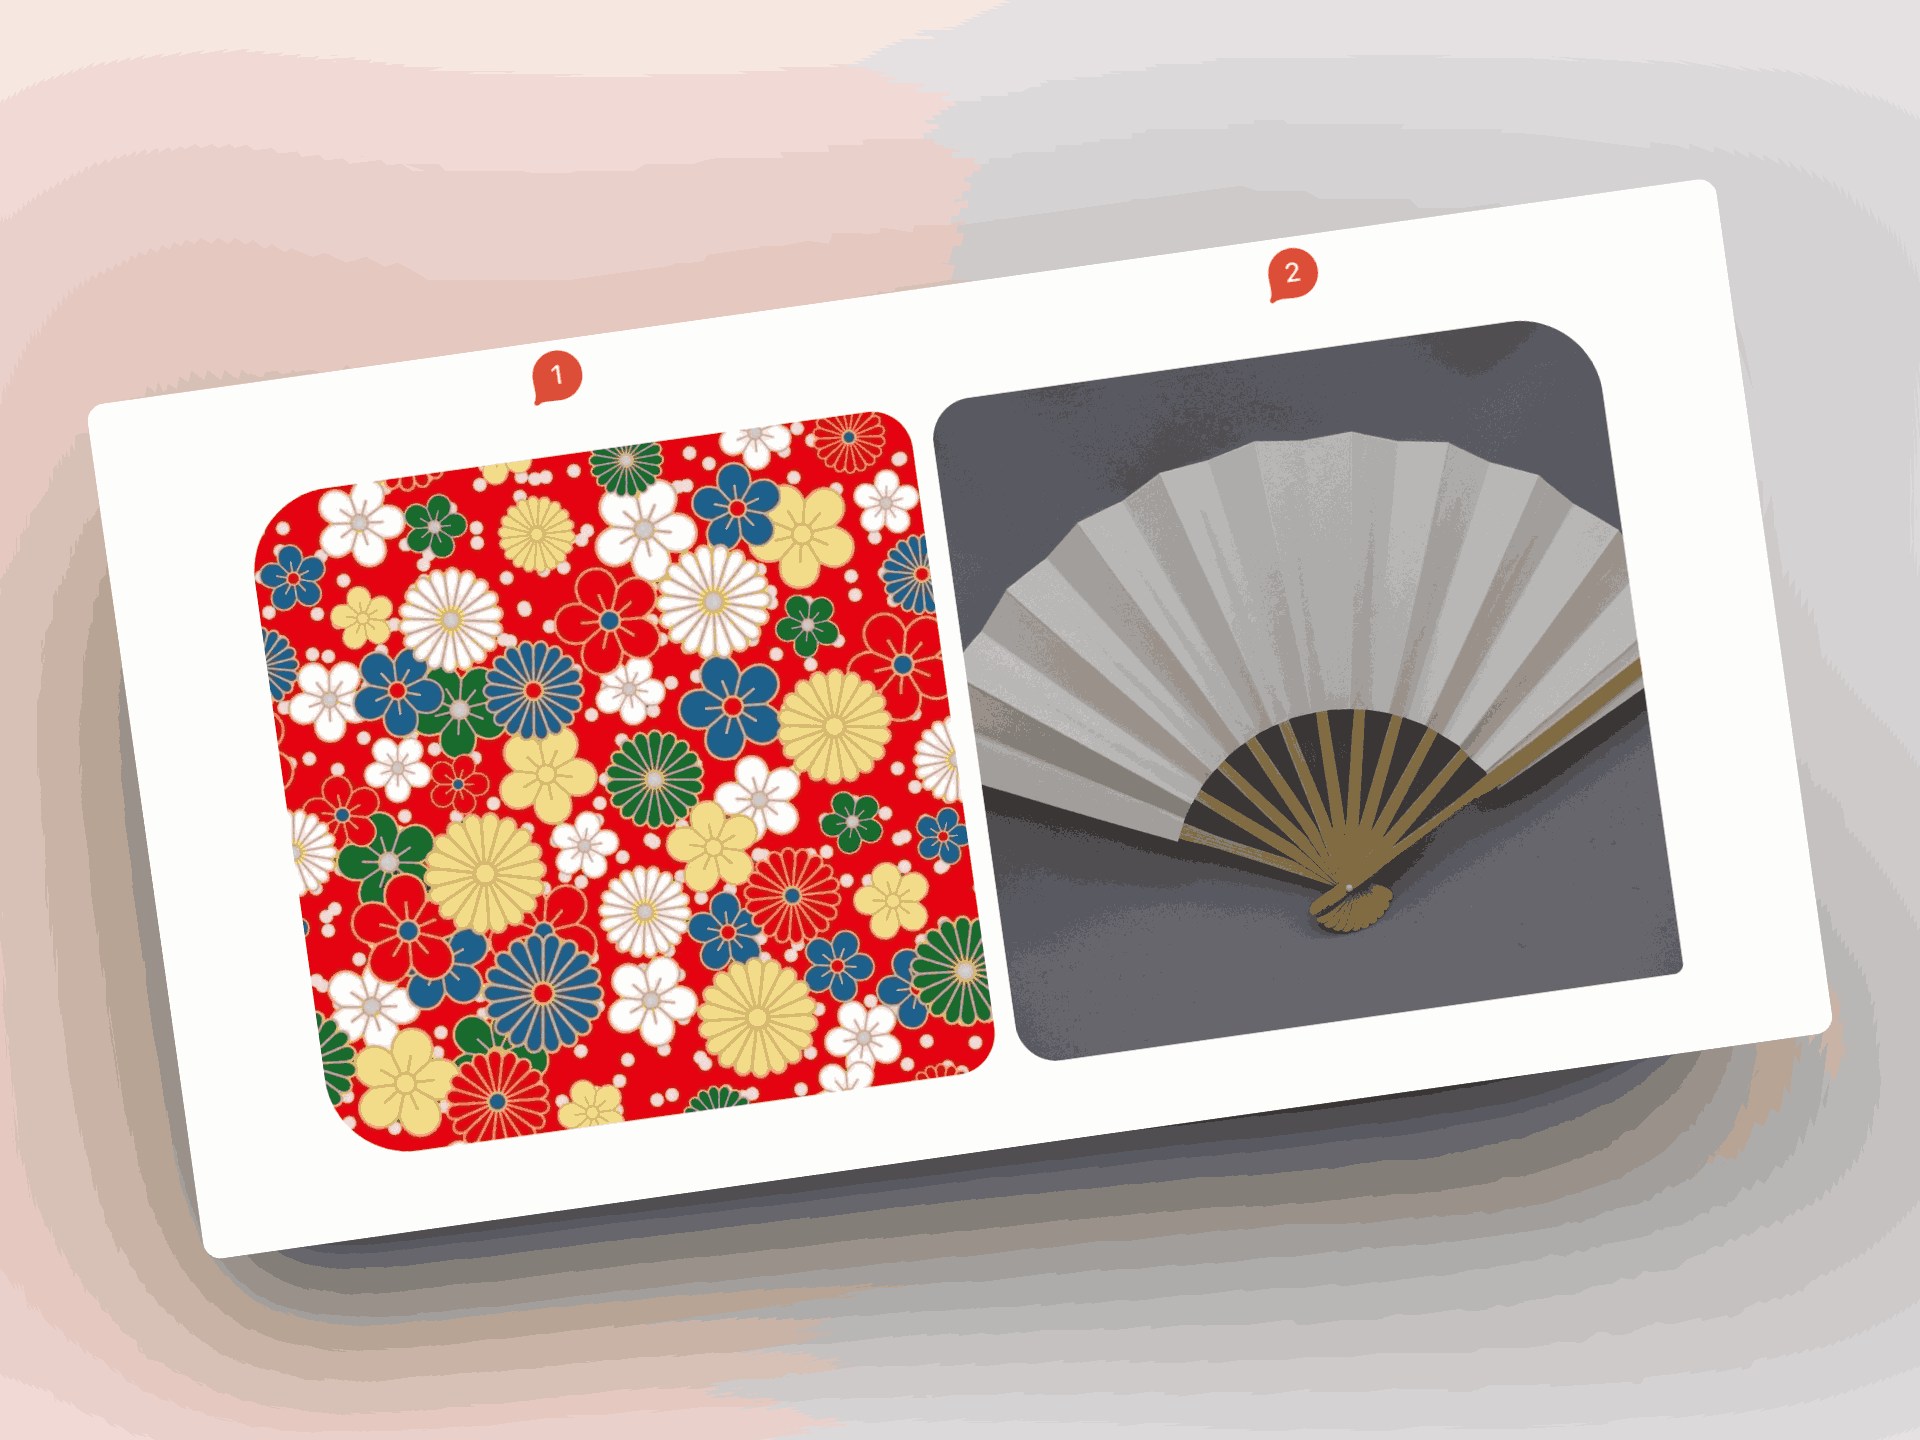
把花纹填充到图片中可以让您的图片更具艺术感和创意。

在这篇文章中,我们将介绍如何使用 ChatGPT 来为图片添加花纹和纹理。

比如把下面的花纹填充到扇子图片中:

img

步骤

1. 打开 ChatGPT, 在输入框中上传图片。并输入 @DALL・E (一个 ChatGPT 的用于生成图片的插件)选中后,输入以下文本:

把图 1 的花纹图片填入图 2 中的扇子中。

img

2. 点击“生成”按钮,等待 ChatGPT 生成结果。

img

补充

如果不选择 @DALL・E 直接使用 ChatGPT 也可以,但效果好像不如 @DALL・E

下面是不选择 @DALL・E 的效果:

img

· 約2分
wen

背景

使用 ChatGPT 生成带有中文的图片的图片时,中文会出现乱码的问题。本教程将介绍如何解决这个问题。

比如,我让 ChatGPT 生成一个带有中文的图片,输入如下:

请生成一张猫的照片,并在照片上加上中文字 “猫咪”

生成的图片如下:

img

步骤

1. 下载中文字体,比如有名的 Noto Serif SC

下载地址:Noto Serif SC

如果你想显示日语韩语等其他语言,可以下载 Noto Serif CJK 字体。

下载解压后会得到以下几个像 NotoSerifSC-xxx.otf 这样的字体文件。

xxx 部分表示的是字体的粗细,可以根据自己的需要选择。

这次我们用的是 NotoSerifSC-Regular.otf

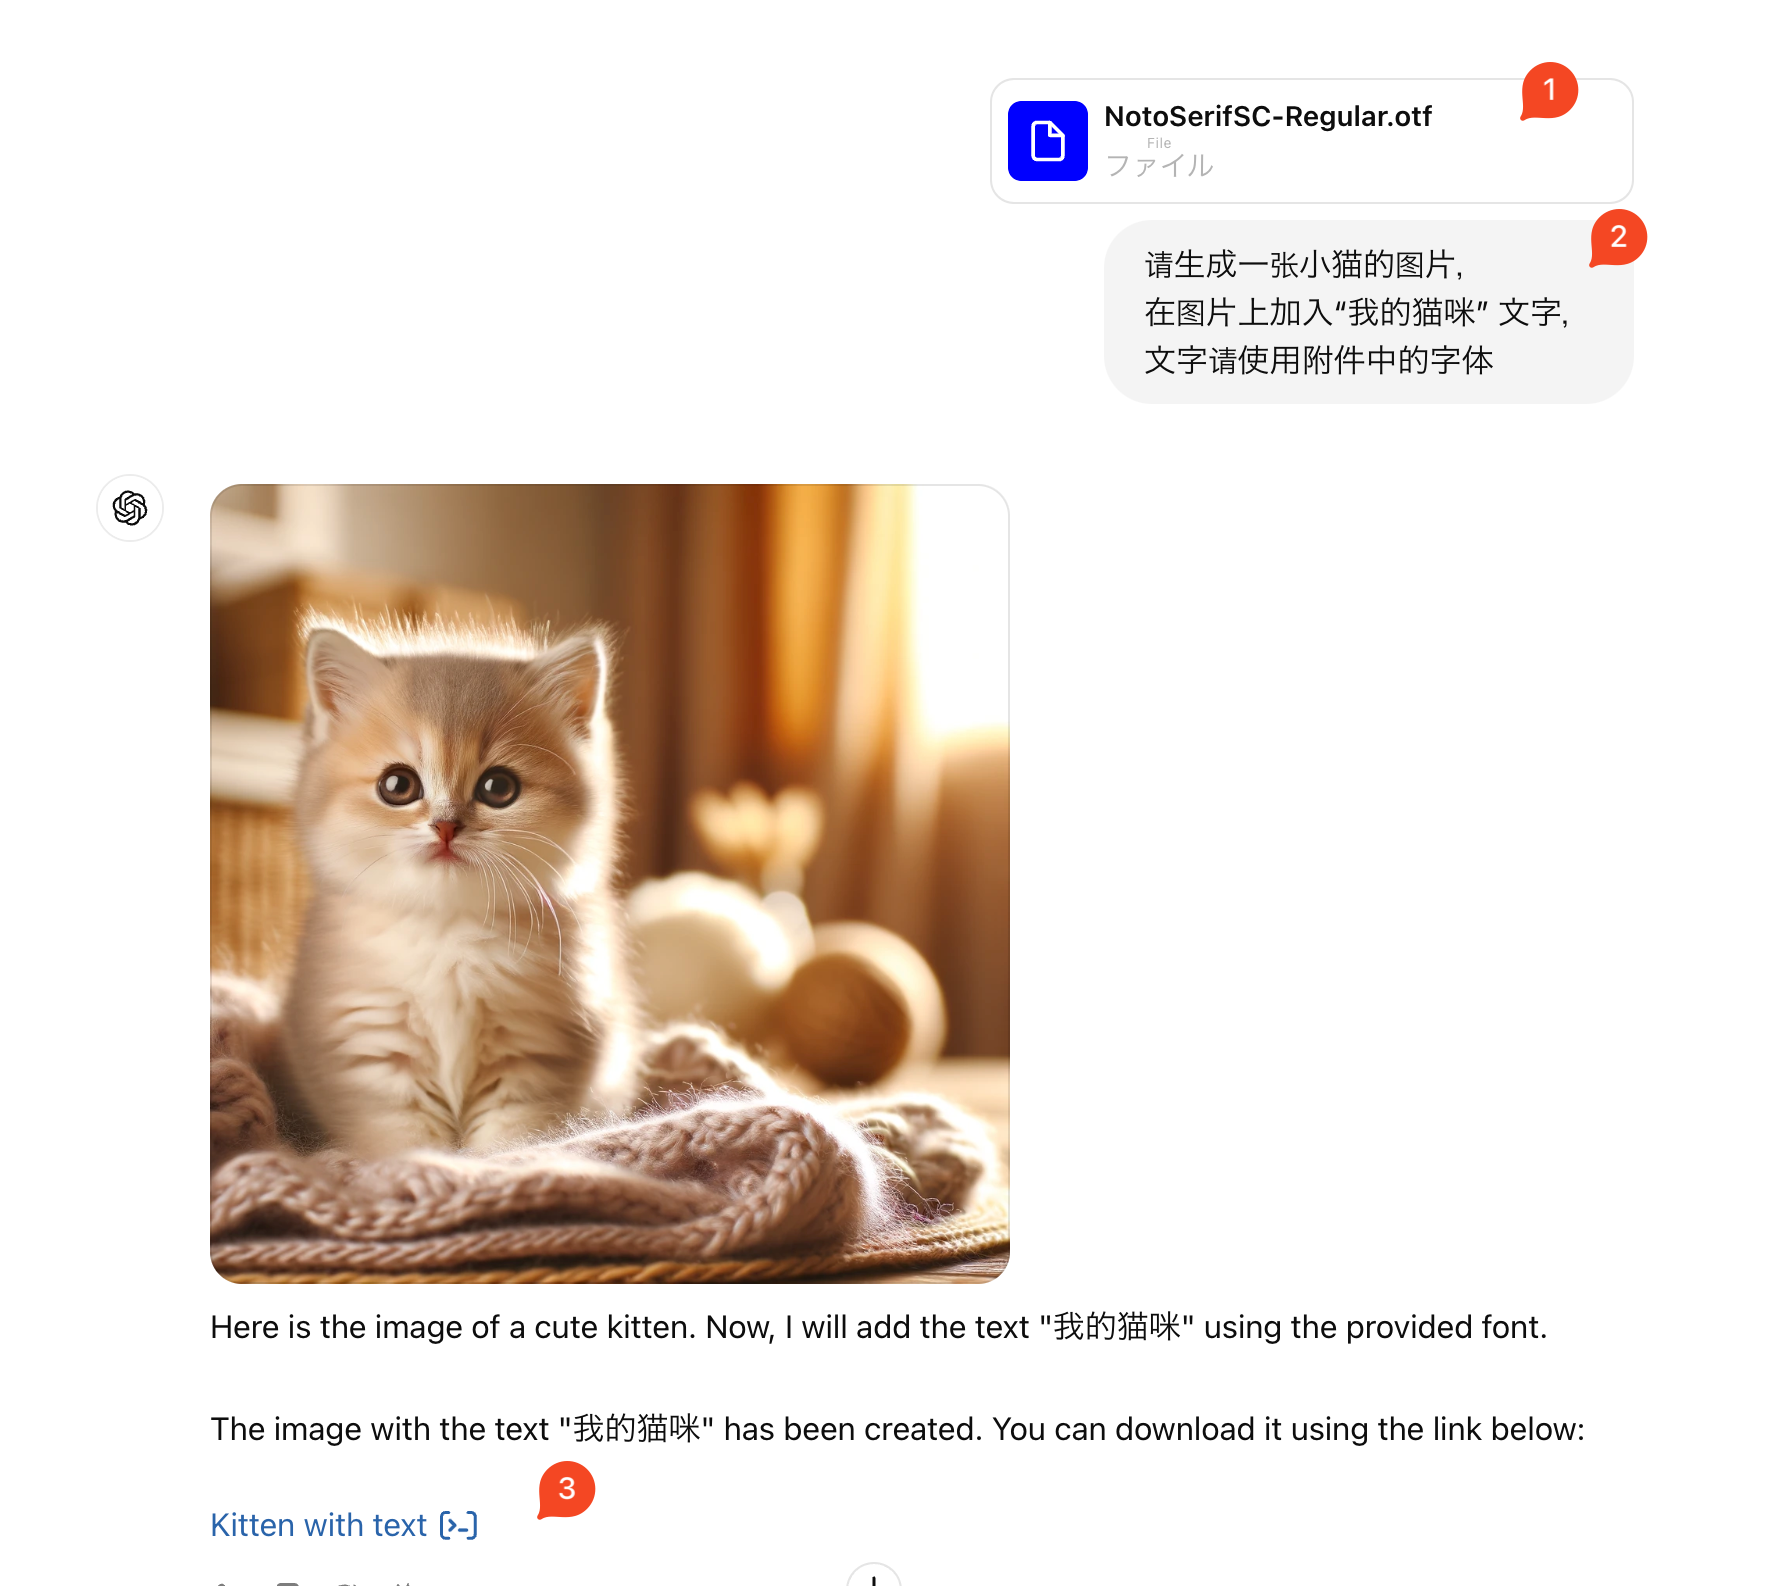
2. 打开 ChatGPT,上传字体文件,输入你的 prompt

请生成一张猫的图片
在图片上加入“我的猫咪” 字样
请使用附件中的字体。

img

点击 3️⃣ 下载图片。

3. 生成图片

img

4. 扩展

上面生成的图片,没有指定文字的位置和颜色。现在默认好像是用黑色并显示在图片的底部中间。

如果你想指定文字的位置和颜色,可以在 prompt 中加入更多的信息。

比如:

请生成一张小猫的图片,
在图片上的左上角加入“我的猫咪” 文字,文字颜色用白色
文字请使用附件中的字体

生成的图片就会是这样:

img

· 約2分
wen

前言

Docusaurus 是一个由 Facebook 开发的开源项目,用于构建静态网站。

它是一个基于 React 的静态网站生成器,可以帮助您快速创建网站。

Docusaurus 还提供了一个易于使用的博客插件,可以帮助您创建博客。

Docusaurus 默认不提供 RSS 导航菜单,在本文中,我们将介绍如何为 Docusaurus 博客添加 RSS 导航菜单。

怎么给 Docusaurus 博客 添加 RSS 导航菜单

docusaurus.config.js
module.exports = {
...
themeConfig: {
...
navbar: {
items: [
// blog rss
{
href: '/blog/rss.xml',
label: 'RSS',
position: 'right',
target: '_blank', // Open the link in a new tab/window
},
],
...

补充说明

BTW, 如果用 to 选项的话,点击 RSS 链接会报页面无法找到的 404 错误,

因为 Docusaurus 会把 to 选项的值当作一个页面的路径,而不是一个链接。

docusaurus.config.js
module.exports = {
...
themeConfig: {
...
navbar: {
items: [
// blog rss
{
to: '/blog/rss.xml',
label: 'RSS',
position: 'right',
},
],
...

· 約2分
wen

问题

有 2 个数组,互相可能有重复的元素,如何合并这两个数组并去重?

比如有两个数组:

type User struct {
ID int // ID 作为唯一标识 (ID相同则认为是同一个元素)
Name string
}

old := []User{
{ID: 1, Name: "a"}, // only in old
{ID: 2, Name: "b"}, // 重复
}

new := []User{
{ID: 2, Name: "c"}, // 重复
{ID: 3, Name: "d"}, // only in new
}

合并后的结果应该是:

c := []User{
{ID: 1, Name: "a"}, // only in old
{ID: 2, Name: "c"}, // 重复 (保留 new 中的)
{ID: 3, Name: "d"}, // only in new
}

解决方案(一般化)

package main

import "fmt"

type User struct {
ID int
Name string
}

// contains Check if an element exists in a slice.
// keyFunc is used to uniquely identify the elements.
func contains(slice []any, item any, keyFunc func(any) any) bool {
for _, element := range slice {
if keyFunc(element) == keyFunc(item) {
return true
}
}
return false
}

// mergeSlices Merges two slices and removes duplicates.
//
// keyFunc is used to uniquely identify the elements.
// if an element exists in both old and new, the element in new takes precedence.
// old and new are assumed to have no duplicate elements.
// The order is not guaranteed.
func MergeSlices(old, new []any, keyFunc func(any) any) []any {
var merged []any

// copy new to merged
merged = append(merged, new...)

for _, item := range old {
if !contains(merged, item, keyFunc) {
merged = append(merged, item)
}
}

return merged
}

func main() {
old := []any{
User{ID: 1, Name: "a"},
User{ID: 2, Name: "b"}, // 重複
}
new := []any{
User{ID: 2, Name: "c"}, // 重複
User{ID: 3, Name: "d"},
}

mergedUsers := MergeSlices(old, new, func(item any) any {
return item.(User).ID
})
fmt.Printf("Merged Users:%+v", mergedUsers) // Merged Users:[ {ID:1 Name:a} {ID:2 Name:c} {ID:3 Name:d}]
}

· 約3分
wen

背景和需求

我在写博客或者周报的时候,一般会这样管理我的分支:

  • 1). 创建带日期的分支,比如 blog/2024-01-28, weekly/2024-01-28
  • 2). 然后在这个分支上写好博客或者周报。
  • 3). 创建 PR,合并到 main 分支。
  • 4). 合并到 main 分支后,会触发 CD 自动部署。

步骤 3) 很容易忘记,所以我想通过 GitHub Actions 来自动化这个过程。

方案

创建一个 Github Actions 的 Workflow,每天定时检查分支名,

发现有当天的日期的分支 weekly/xxxx-xx-xx 的时候,自动创建 PR 并合并到 main 分支。

实现

准备工作

  1. 在 Github 中创建一个 Personal Access TokenPAT),用于创建和合并 PR。(BTW,到期时间最大只能设置 2 年) 1.1. 设置 PAT 的仓库权限: Repository accessOnly select repositories → 选择你的仓库。 1.2. 设置 PAT 的仓库访问权限: PermissionsRepository permissionsimg
  2. 在仓库中创建一个 secret,用于存放 Personal Access Token。

创建 Workflow

在仓库中创建 .github/workflows/merge-pr.yml 文件,内容如下:

name: Merge Weekly Posts Branches
on:
schedule:
- cron: "00 00 * * *"
workflow_dispatch:

jobs:
merge_weekly_branch:
runs-on: ubuntu-latest

steps:
- name: Checkout repository
uses: actions/checkout@v4

- name: Set up Git
run: |
git config --global user.email "[email protected]"
git config --global user.name "GitHub Actions"

- name: Create and merge PR
env:
GITHUB_TOKEN: ${{ secrets.GH_TOKEN }} # Personal Access Token
run: |
# Get the current date in the format 'YYYY-MM-DD'
current_date=$(date +%Y-%m-%d)

# Construct the branch name
branch_name="weekly/${current_date}"
# Fetch the branch to ensure it exists locally
git fetch origin ${branch_name}

# Check if the branch exists
if [[ -n "$(git ls-remote origin $branch_name)" ]]; then
git checkout ${branch_name}
# Create a pull request using GitHub CLI
gh pr create --base main --head $branch_name --title "weekly post PR" --body "This is a PR for weekly post changes."

# Wait for a few seconds to allow GitHub to process the PR creation
sleep 15
# Merge the pull request using GitHub CLI
gh pr merge --squash
else
echo "Weekly branch '${branch_name}' does not exist."
fi

· 約1分
wen

Problem

I was trying to run a Makefile in VSCode and I got the following error:

Makefile:4: *** missing separator.  Stop.

Solution

The problem is that the Makefile is using tabs instead of spaces. To fix this, you can:

  1. Open the Makefile in VSCode
  2. Open the command palette with Ctrl + Shift + P or View > Command Palette. If you are using a Mac, you can use Cmd + Shift + P
  3. Search for Convert Indentation to Tabs

If you want to prevent this from happening in the future, you can:

  1. Open settgings in VSCode with Ctrl + , or File > Preferences > Settings. If you are using a Mac, you can use Cmd + ,
  2. Search for Insert Spaces
  3. Uncheck the box for Editor: Insert Spaces

img

· 約4分
wen

问题

如何计算字符串中的(所见)字符数是一个常见的问题。

在 Golang 中,我们可以使用utf8.RuneCountInString()函数来计算字符串中的字符数。

中文这样的多字节字符也可以正确计算。

示例

package main

import (
"fmt"
"unicode/utf8"
)

func main() {
str := "abc世界"
fmt.Println(utf8.RuneCountInString(str)) // 5
}

但是如果字符串中包含 👉🏻 这样的 emoji 字符,那么有些情况下这个函数就无法正确计算了。

package main

import (
"fmt"
"unicode/utf8"
)

func main() {
emojiWorld := "🌍"
fmt.Println(utf8.RuneCountInString(emojiWorld)) // 1 ✅ 没有问题

emojiHand := "👉"
fmt.Println(utf8.RuneCountInString(emojiHand)) // 1 ✅ 没有问题

emojiHandBlack := "👉🏿"
fmt.Println(utf8.RuneCountInString(emojiHandBlack)) // 2 ❌ 有问题 期望是 1。 同一种 emoji,但是不同的皮肤颜色的字符数不一样

emojiOne := "1️⃣"
fmt.Println(utf8.RuneCountInString(emojiOne)) // 3 ❌ 有问题 期望是 1。
}

emoji 可以从这里emojipedia复制。

原因

这是因为有些 emoji 是多个 unicode 字符 (Code Points) 组合而成的,而 utf8.RuneCountInString() 函数只会计算 unicode 字符的数量。

术语描述
Bytes(字节)计算数据存储的最小单元,通常是 8 位二进制。
Code Units(编码单元)在编码方案中,用于表示一个字符的固定大小的单元。在 UTF-8 中,一个 Code Unit 是 8 位,而在 UTF-16 中,是 16 位。
Code Points(码点)在 Unicode 标准中,每个字符都被分配一个唯一的代码点,是一个用来标识字符的数字。例如,拉丁字母"A"的代码点是 U+0041。
Grapheme Clusters(字符簇)表示语言中可感知的最小字符单元,通常是一个或多个 Code Points 组成的序列。例如,字母加重音符可能是一个 Grapheme Cluster。

比如 1️⃣ 这个 emoji,它是由 3 个 Code Points 组成的,分别是:

img

Rendered by Markdown Table

ヒント

Emoji 的 Code Points 可以在这里emojipedia 查看。

解决方案

所以我们需要计算的是 Grapheme Clusters(字符簇)的数量,而不是 Code Points 的数量。

使用第三方库 rivo/uniseg

package main

import (
"fmt"

"github.com/rivo/uniseg"
)

func main() {
emojiWorld := "🌍"
fmt.Println(uniseg.GraphemeClusterCount(emojiWorld)) // 1 ✅ 没有问题

emojiHand := "👉"
fmt.Println(uniseg.GraphemeClusterCount(emojiHand)) // 1 ✅ 没有问题

emojiHandBlack := "👉🏿"
fmt.Println(uniseg.GraphemeClusterCount(emojiHandBlack)) // 1 ✅ 没有问题

emojiOne := "1️⃣"
fmt.Println(uniseg.GraphemeClusterCount(emojiOne)) // 1 ✅ 没有问题
}

补充

其实不只是 emoji,还有一些泰语,阿拉伯语的字符也是由多个 unicode 字符组成的。

Reference

Go で文字数をカウントする 在 Go 中计算字符数

文字数をカウントする 7 つの方法

Go: Unicode と rune 型

· 約1分
wen

背景

labstack/gommon 的代码中 看到了这个库 valyala/fasttemplate, 于是就去 调查了一下。

ヒント

labstack 是 Echo Web Framework 的 Organization。

什么是 fasttemplate

fasttemplate 是一个高效的 Go 模板引擎,比 Go 标准库的模板引擎 text/template 快很多,

而且比 strings.Replace, strings.Replacerfmt.Fprintf 都要快。

img

具体可以看一下 fasttemplate 的 benchmark

fasttemplate 的使用

基础用法

    template := "http://{{host}}/?q={{query}}&foo={{bar}}{{bar}}"
t := fasttemplate.New(template, "{{", "}}")
s := t.ExecuteString(map[string]interface{}{
"host": "google.com",
"query": url.QueryEscape("hello=world"),
"bar": "foobar",
})
fmt.Printf("%s", s)

// Output:
// http://google.com/?q=hello%3Dworld&foo=foobarfoobar

高阶用法

    template := "Hello, [user]! You won [prize]!!! [foobar]"
t, err := fasttemplate.NewTemplate(template, "[", "]")
if err != nil {
log.Fatalf("unexpected error when parsing template: %s", err)
}
s := t.ExecuteFuncString(func(w io.Writer, tag string) (int, error) {
switch tag {
case "user":
return w.Write([]byte("John"))
case "prize":
return w.Write([]byte("$100500"))
default:
return w.Write([]byte(fmt.Sprintf("[unknown tag %q]", tag)))
}
})
fmt.Printf("%s", s)

// Output:
// Hello, John! You won $100500!!! [unknown tag "foobar"]