メインコンテンツまでスキップ

· 約1分
wen

背景

刚加入新公司,接手了一个项目,什么资料也没有。 🥲

想要了解这个项目,一个比较直接的办法就是先看看数据库的 ER 图,手动画图太麻烦,

Google 了下, 发现可以用 JetBrainsDataGrip 来导出 ER 图。

步骤

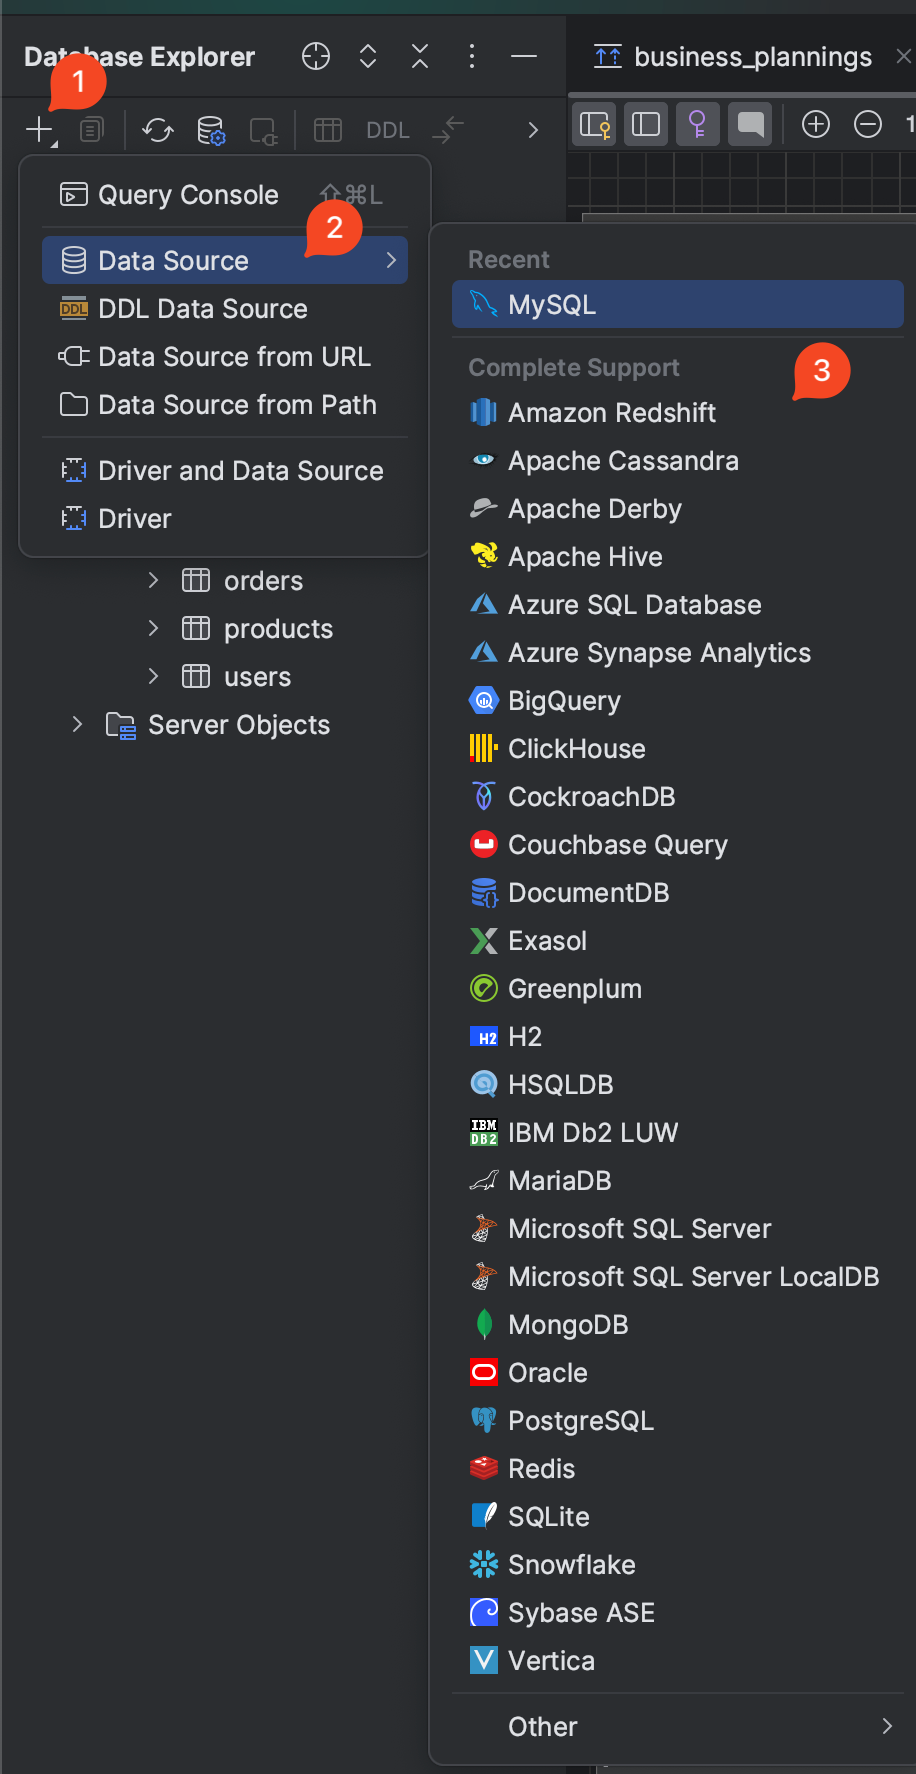
1. Connect to database

1️⃣. Click + button in the left panel

2️⃣. Select Data Source -> MySQL(or other database)

3️⃣. Fill in the your database information

img

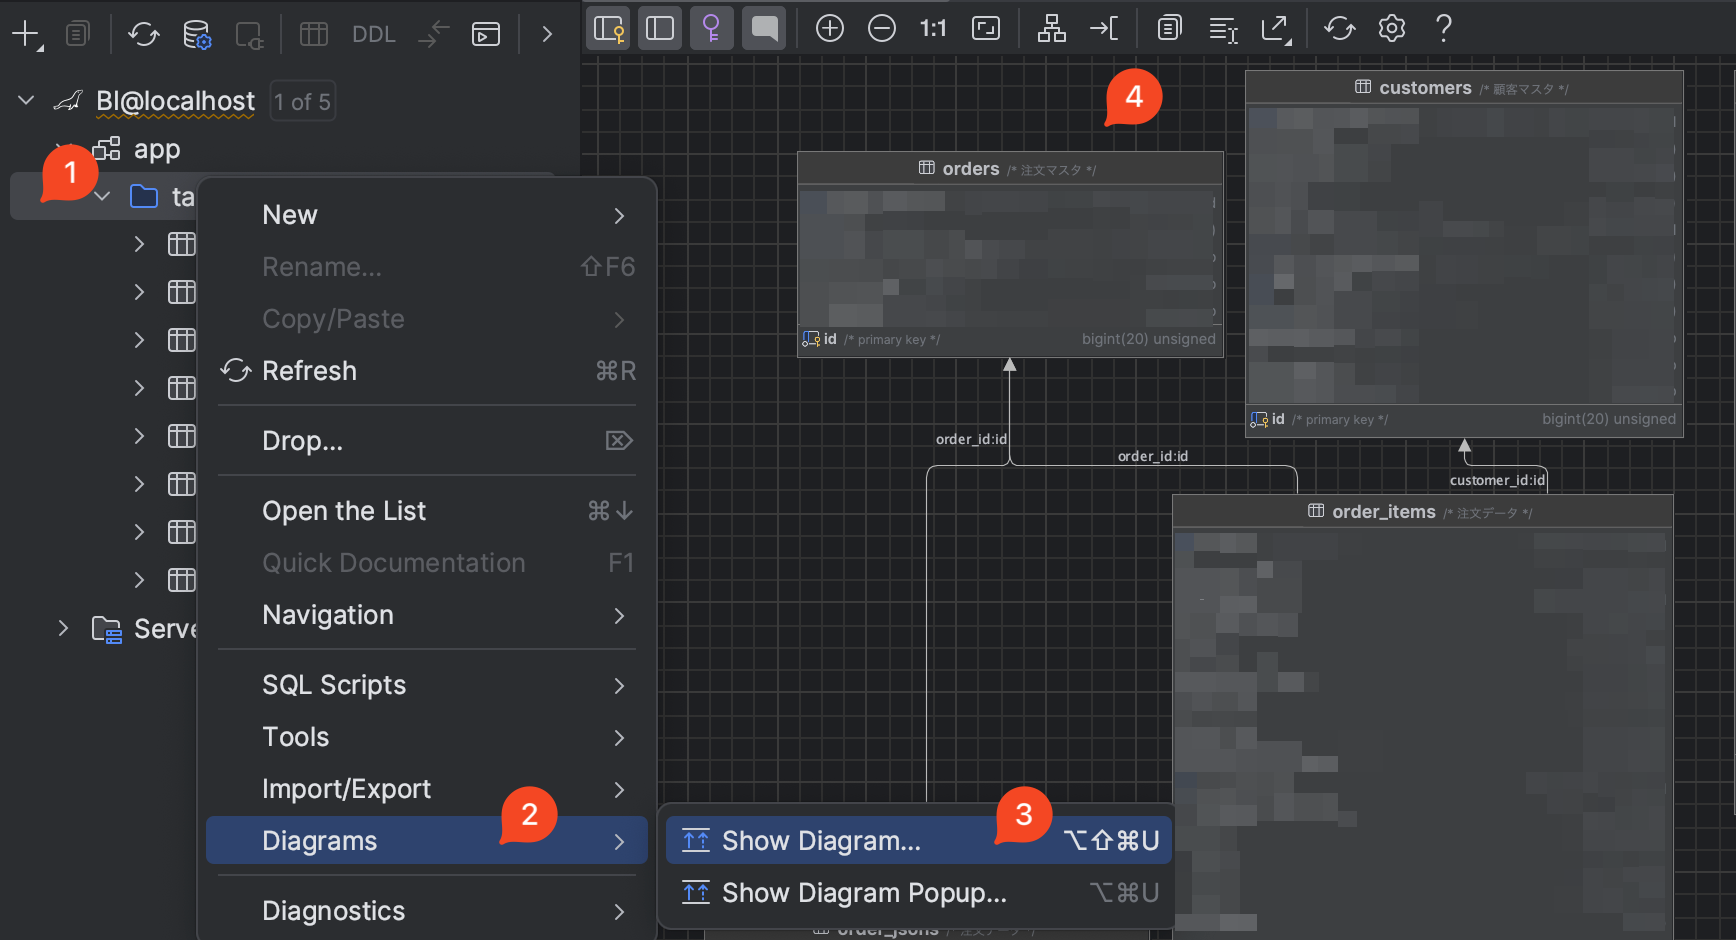
2. Show diagram

1️⃣. Right click the database you want to show

2️⃣ 3️⃣. Select Diagram -> Show Diagram

4️⃣. Then you will see the ER diagram

img

扩展

DataGrip 还有很多功能,比如可以直接在里面写 SQL,还可以直接导出 SQL Script,等等。

点击这里查看更多功能。

· 約1分
wen

背景

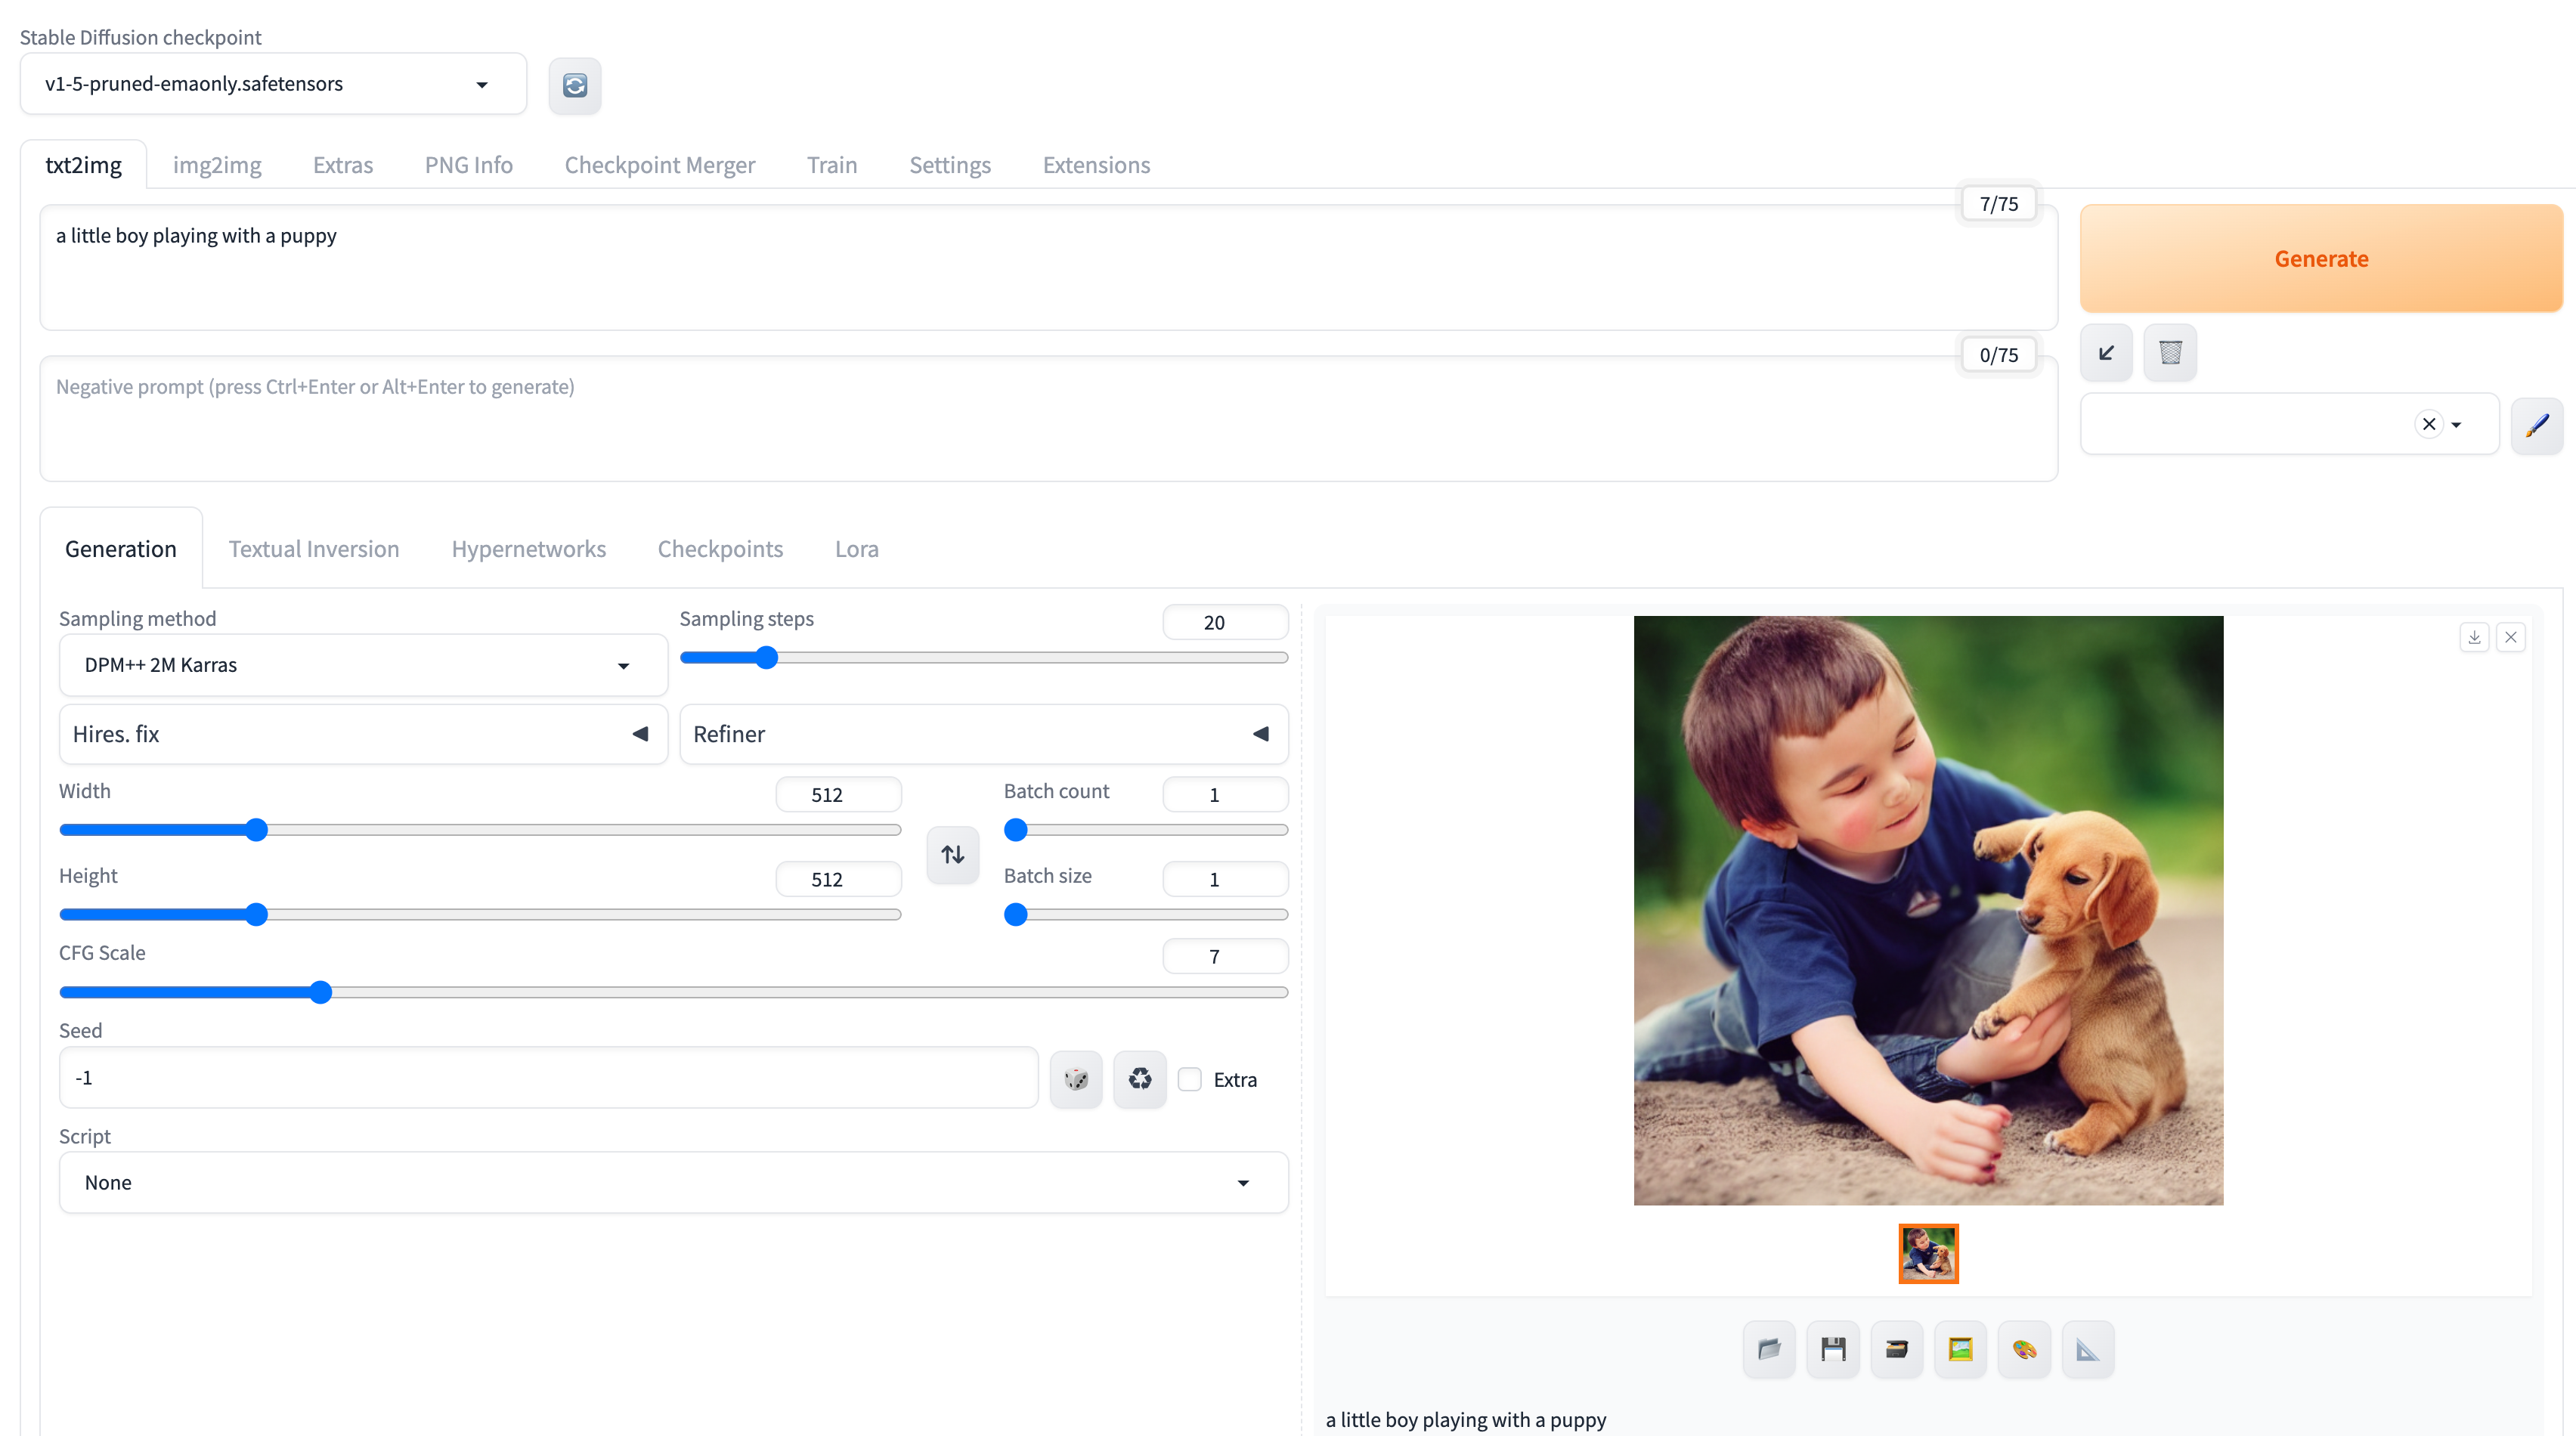
Diffuses Apphuggingface 推出的一个 App。

结论

以下基于 Version 1.1 (20230222.140932) 进行介绍.

先说结论,让它画猫画狗可能还行,画人就惨不忍睹了。😄

而且除了默认提供的 5 个模型(选择后会自动下载),不能加载其他模型。

一些生成结果

画狗

  • Prompt: Labrador in the style of Vermeer
  • Model: stabilityai/stable-diffusion-2-base

img

画人

危険

下面的图片有点恐怖哦。。。 😨 而且我都是我重复多次,选相对好的结果。

  • Prompt: Japanese beauty
  • Model: stabilityai/stable-diffusion-2-base

img

  • Prompt: Chinese beauty
  • Model: stabilityai/stable-diffusion-2-base

img

  • Prompt: Korean beauty
  • Model: stabilityai/stable-diffusion-2-base

img

  • Prompt: American beauty
  • Model: stabilityai/stable-diffusion-2-base

img

· 約2分
wen

Update Docusaurus to v3

Docuaurus v3 已经发布了, 官方提供了升级指南, 这里还是记录一下升级过程吧。😄

升级依赖

  • docusaurus.config.js
docusaurus.config.js

-const lightCodeTheme = require('prism-react-renderer/themes/github');
-const darkCodeTheme = require('prism-react-renderer/themes/dracula');
+const { themes } = require('prism-react-renderer');
+const lightTheme = themes.github;
+const darkTheme = themes.dracula;

prism: {
- theme: lightCodeTheme,
- darkTheme: darkCodeTheme,
+ theme: lightTheme,
+ darkTheme: darkTheme,
},

  • package.json
package.json
   "dependencies": {
- "@docusaurus/core": "2.4.3",
- "@docusaurus/preset-classic": "2.4.3",
- "@docusaurus/theme-mermaid": "^2.4.3",
- "@mdx-js/react": "^1.6.22",
+ "@docusaurus/core": "3.0.0",
+ "@docusaurus/preset-classic": "3.0.0",
+ "@docusaurus/theme-mermaid": "^3.0.0",
+ "@mdx-js/react": "^3.0.0",
"clsx": "^1.2.1",
- "prism-react-renderer": "^1.3.5",
- "react": "^17.0.2",
- "react-dom": "^17.0.2"
+ "prism-react-renderer": "^2.1.0",
+ "react": "^18.2.0",
+ "react-dom": "^18.2.0"
},
"devDependencies": {
- "@docusaurus/module-type-aliases": "2.4.3"
+ "@docusaurus/module-type-aliases": "3.0.0",
+ "@docusaurus/types": "3.0.0"
},


"engines": {
- "node": ">=16.14"
+ "node": ">=18.0"
}

重新安装依赖

删除 node_modules 目录和 package-lock.json 文件,然后重新安装依赖。

npm install

检查 md/mdx 文件

  • 官方提供了工具来检查 md/mdx 文件中的 frontmatter 是否符合 MDX v3。
npx docusaurus-mdx-checker

你可能需要修改一些文件,比如我升级到 v3 后,就遇到了一个格式问题:

  • 修改前
<details><summary>xxx</summary>
...
</details>
  • 修改后
<details>
<summary>xxx</summary>
...
</details>

· 約2分
wen

git commit --amend --no-edit

当你觉得你已经把某个 issue 修改好了,可实际上你没能一次性修改好(也许只是有些 typo);

OR

当你确实已经把某个 issue 修改好了,可你忘记了 add 一些文件时,

你可以这么做:

git add .
git commit --amend --no-edit # --no-edit 选项表示不修改 commit message。
git push -f # 如果你已经 push 过了,需要添加 -f 来强制 push。
注記

其实我就是为了体验下 mermaidjs 的 gitGraph 功能而写的这篇文章 😄。

BTW, gitGraph 的 commit message 默认是 rotated 的。

如果你想要更改成水平的,需要在 docusaurus.config.js 中添加如下配置:

+      mermaid: {
+ options: {
+ gitGraph: { rotateCommitLabel: false },
+ },
+ },

· 約5分
wen

刚过了不惑之年,有点感伤,碰巧听到这首歌,很有感触。

是不是该写封信给 10 年后的自己呢?😀

LRC 歌词:

曲名 : letter song (10年後の私へ)
作词 : doriko
作曲 : doriko
好きな人と歩いた場所も (曾和喜欢的人一起走过的地方)
その時見た景色も (那时曾看到的景色)
振り返らず 今を駆け抜け (统统抛掉 不再回头 向前飞奔)
私は何と出会うの (我将会遇见些什么呢)
立ち止まるほど (驻足不前)
意味を問うほど (探索意义)
きっとまだ大人ではなくて (一定是我还不够成熟)
今見てるもの (现在看到的事物)
今出会う人 (现在遇见的人)
その中でただ前だけを見てる (在这片纷繁喧嚣之中 我只会看向前方)
10年後の私へ (致十年以后的我)
今は幸せでしょうか (现在的你感到幸福么?)
それとも悲しみで (还是正沉浸在悲伤中)
泣いているのでしょうか (默默地流着泪?)
けどあなたの傍に (不过在你的身旁)
変わらないものがあり (依然会有不变的存在)
気付いていないだけで (未能察觉的你)
守られていませんか (依然在被守护着吧)
過ぎし日々に 想いを預け (把思念寄托于流逝的日子里)
時間だけ ただ追いかけてく (只有时间在不停的追赶)
背に寄り添った 誰かの夢に (托付在我肩上的 是谁的梦想)
振り向ける日がいつか来るのかな (总有一天必须要面对的吧)
10年後の私へ (致十年以后的我)
今は誰を好きですか (现在的你喜欢着谁呢?)
それとも変わらずに (还是和以前一样)
あの人が好きですか (继续喜欢着那个人呢?)
けどいつか (不过 现在的你)
知らない誰かを愛する前に (在爱上某个人之前)
自分のことを好きと (“喜欢自己”这句话)
言えるようになりましたか (能否先说出来呢)
大切な人たちは (我所珍爱的朋友们)
今も変わらずいますか (依然在反复平凡地生活吗?)
それとも遠く離れ (还是已经远去)
それぞれ歩んでますか (踏上了各自的旅途)
けど そんな出会いを (但是在重复了无数次的相遇)
别れを 缲り返して (和离别之后)
今の私よりも (是否比现在的我)
すてきになっていますか (更有魅力呢?)
10年後の私へ (致十年后的我)
今がもし幸せなら (如果现在的你是幸福的)
あの日の私のこと (从前的我)
思い出してくれますか (能否请你想起来呢)
そこにはつらいことに (回忆中的我)
泣いた私がいるけど (一定在伤心的哭泣吧)
その涙を優しく (请将这眼泪温柔地)
思い出に変えてください (融入记忆的海洋)

· 約3分
wen

0. 背景

换电脑的时候,需要把一些配置文件从旧电脑迁移到新电脑上,比如 .zshrc.vimrc.gitconfig 等等。 有些文件不一定放在 home 目录下,比如 .ssh/config.config/.starship.yaml , 这些文件手动迁移的话,比较麻烦。 所以需要一个工具来管理这些配置文件。

1. 具体需求

  • 支持多平台,比如 macOS、Linux、Windows。
  • 支持版本管理,比如 git。
  • 支持模版。

大概调研了一下,发现有这么几个工具可以管理 dotfiles:

  • chezmoi
    • Golang 写的
    • Github Star 10.2k
  • dotbot
    • Python 写的
    • Github Star 6.5k

chezmoi 满足要求,而且是用 Golang 写的,没有什么依赖,所以就用 chezmoi 了。

2. 安装

sh -c "$(curl -fsLS get.chezmoi.io)"

其他安装方式见 Install

3. 使用

3.1 初始化

ヒント

初始化之后,会在 home 目录下生成一个 ~/.local/share/chezmoi 目录(本地仓库),用来存放 chezmoi 的配置文件。 可以通过 chezmoi cd 命令进入该目录。

3.2 添加文件

3.3 更新文件

ヒント

更新了文件了之后,记得提交到远程仓库。可以参考上一节。

3.4 从远程仓库拉取文件

远程仓库有更新了,需要拉取到本地。

chezmoi update

等价于

chezmoi git pull origin main
chezmoi apply

3.5 扩展使用

3.5.1 模版

chezmoi 支持模版,可以为不同的 host 生成不同的配置文件。

比如,我要为不同的电脑配置不同的账号名,可以这样做:

  • 创建 ~/.account.json 文件,内容如下:
~/.account.json
{
"name": "thewang"
}
  • ~/.config/chezmoi/chezmoi.toml 中配置 data 字段。
~/.config/chezmoi/chezmoi.toml
[data]
name = "thewang"
  • 添加文件
chezmoi add --autotemplate ~/.account.json

{
"name": "{{ .name }}"
}

· 約3分
wen

0. 背景

私はこれまでmacOSのlauncherとしてAlfred 3を使っていました。 スニペット機能は有料オプションでしたが、課金して使っていました。

最近、Raycastというlauncherを見つけました。 Raycastのスニペット機能は無料で、しかもオープンソースで、自分でカスタマイズできます。

なので、AlfredRaycastに移行することにしました。 しかし、AlfredのスニペットファイルのフォーマットはRaycastのスニペットファイルのフォーマットと異なるため、AlfredのスニペットファイルをRaycastのスニペットファイルに変換する必要があります。

1. Migrate Alfred Snippets to Raycast

1.1 Get Alfred Snippets Files

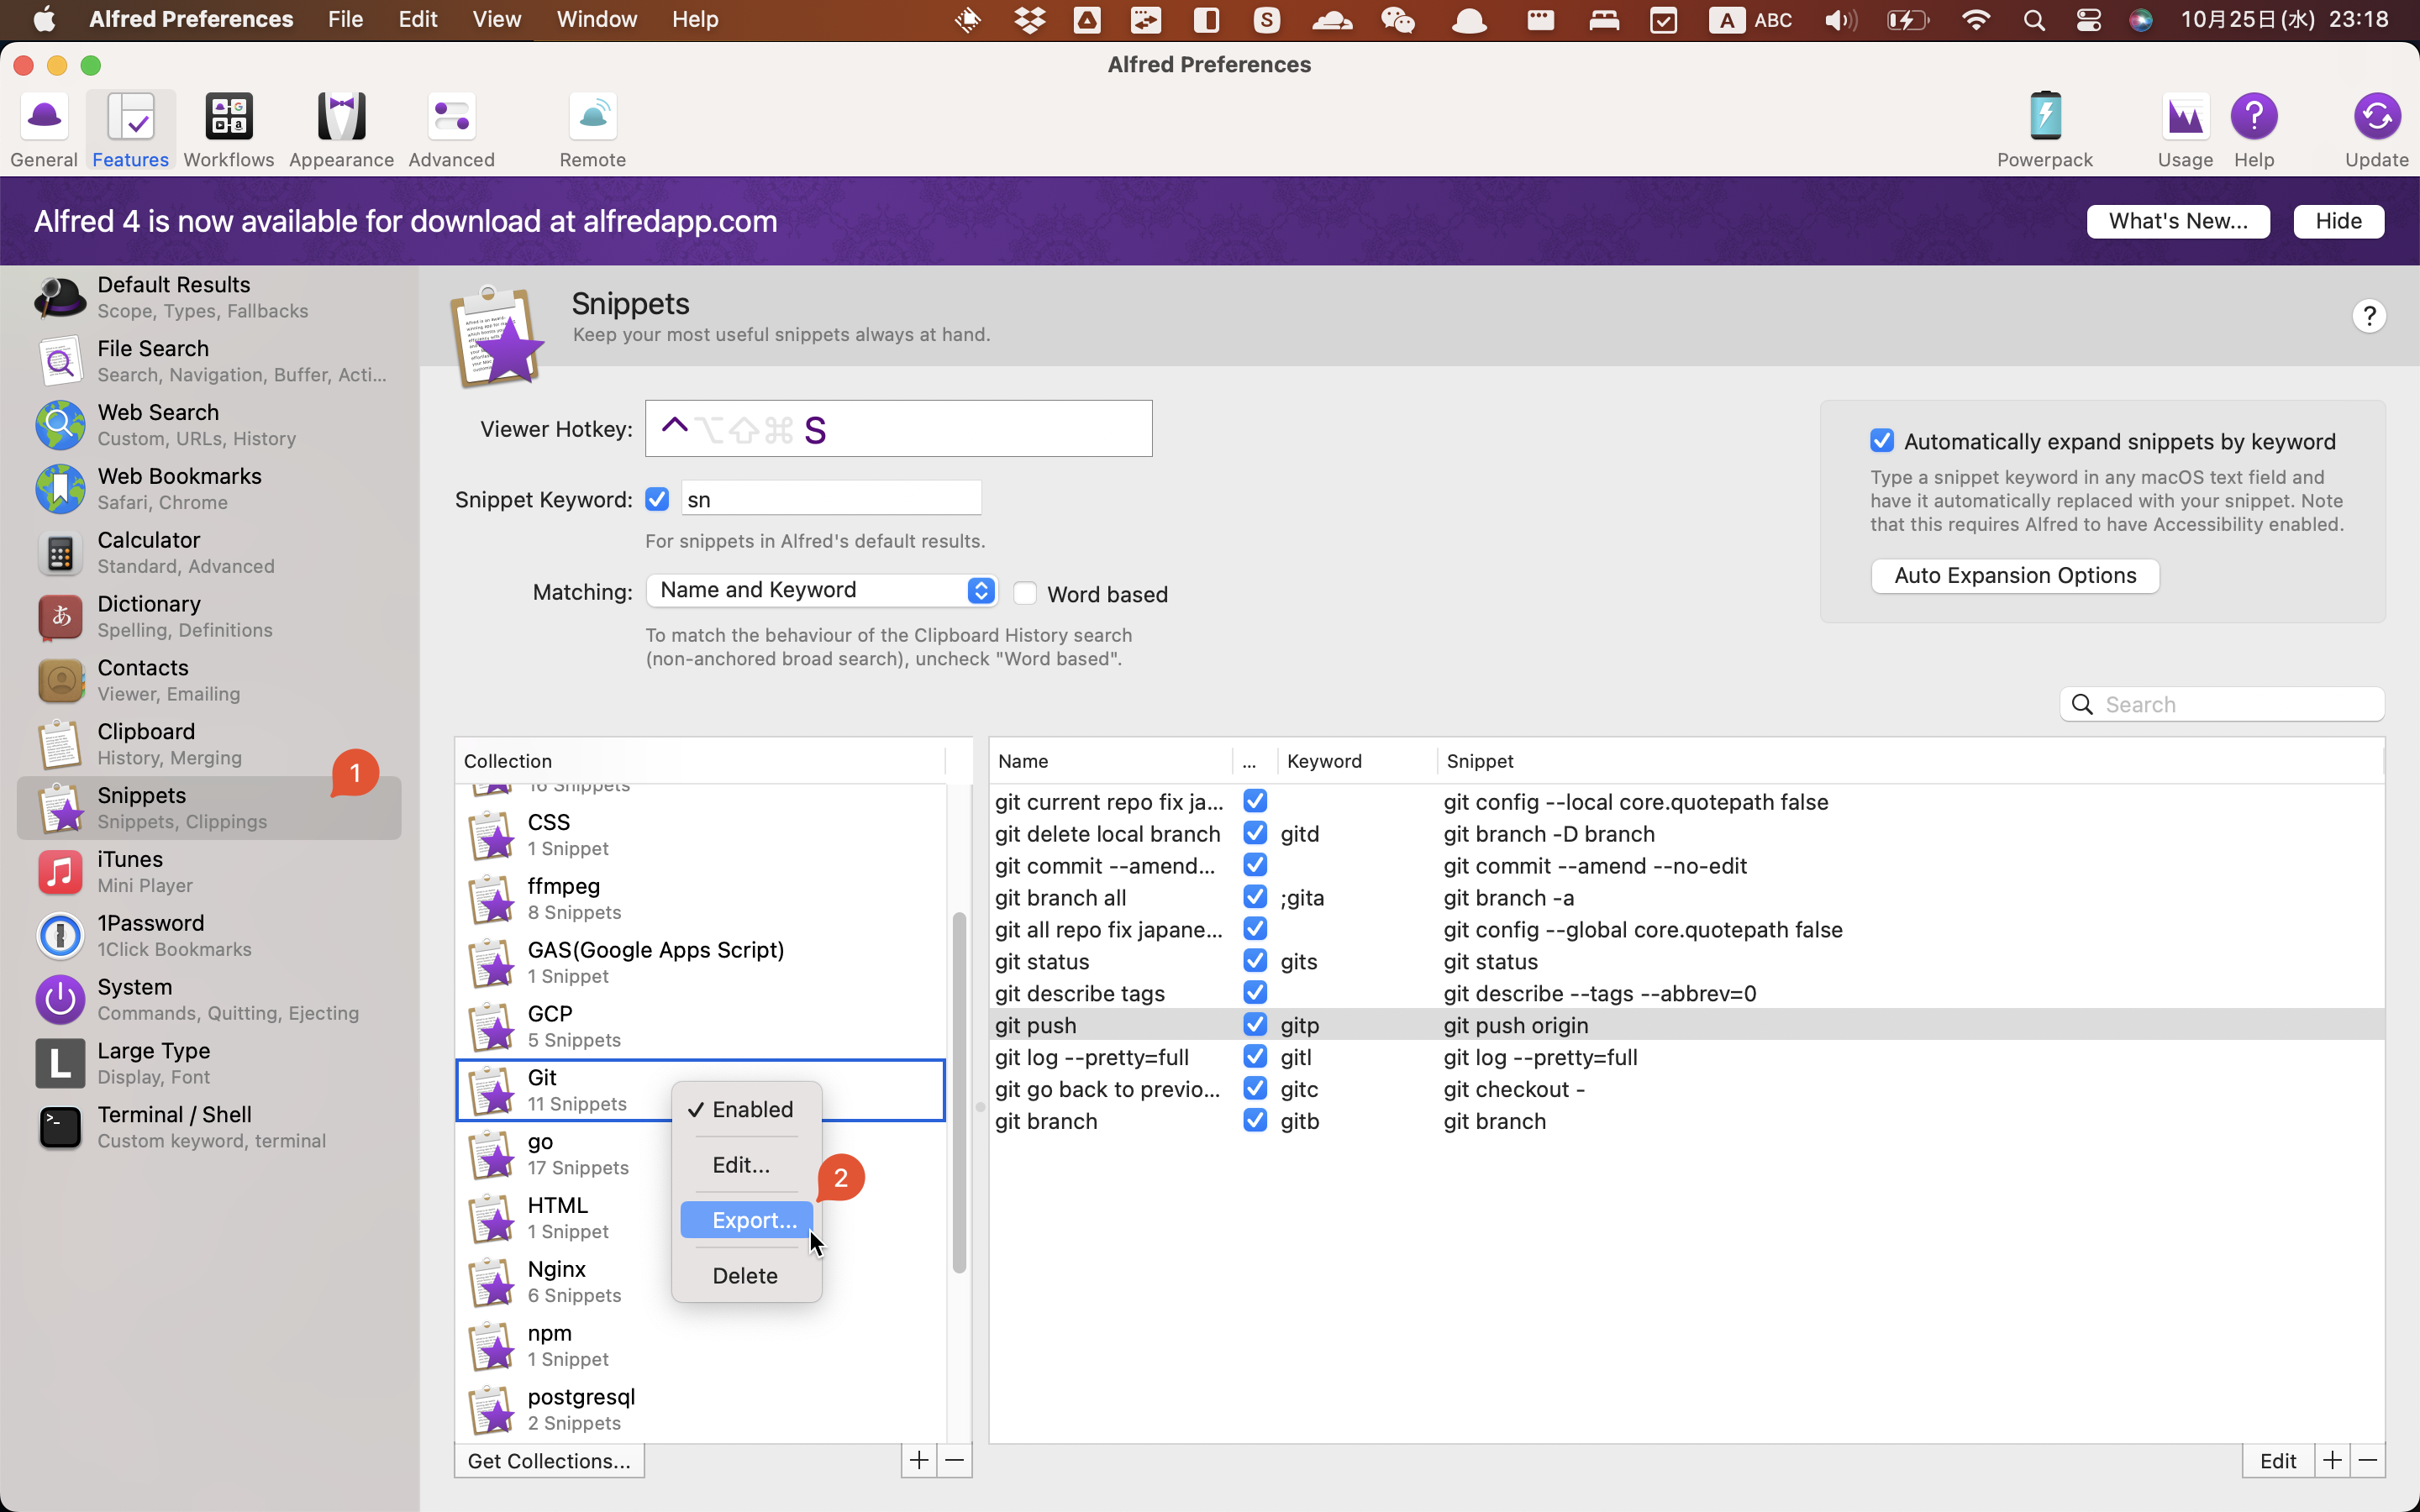
Alfred 3 の collections は一括でエクスポートすることができないので、以下のように一つずつエクスポートする必要があります。🐶

img

1.2 Convert Alfred Snippets to Raycast Snippets

エクスポートしたAlfredのスニペットファイルを新しいフォルダに入れます。 以下の内容でconvert-alfred-snippets-to-raycast-snippets.shファイルを作成します。

convert-alfred-snippets-to-raycast-snippets.sh
#!/bin/sh -e
# Script for converting Alfred snippets to Raycast snippets
# Usage: chmod +x convert-alfred-snippets-to-raycast-snippets.sh; ./convert-alfred-snippets-to-raycast-snippets.sh
# NOTE: Install jq before running this script

# List up all *.alfredsnippets files and rename them to *.zip
for file in *.alfredsnippets; do
mv "$file" "${file%.alfredsnippets}.zip"
done

# Unzip all *.zip files and get the folders name
for file in *.zip; do
unzip -o "$file" # -o: overwrite existing files without prompting
done


# Merge all *.json files to one file for Raycast snippets
jq -s 'map(.alfredsnippet | {name, keyword, text: .snippet})' *.json > ./output.json

# Clean up all files except output.json
for file in *.json; do
if [ "$file" = "output.json" ]; then
continue
fi
rm "$file"
done

for file in *.zip; do
rm "$file"
done

for file in *.plist; do
rm "$file"
done

# You can now import the output.json file to Raycast

echo "Done! 🎉 You can now import the output.json file to Raycast -> Import Snippets"

Github gistからもDL可能です。

注記

このスクリプトを実行するには、コマンドラインのJSON処理ツールであるjqをインストールする必要があります。

Macの場合、Homebrewを使ってjqをインストールすることができます。コマンドはbrew install jqです。 詳しくは公式サイトを参照してください。

以下のコマンドを実行します。

chmod +x convert-alfred-snippets-to-raycast-snippets.sh
./convert-alfred-snippets-to-raycast-snippets.sh

実行すると、現在のディレクトリにoutput.jsonファイルが生成されます。

1.3 Import Raycast Snippets

Raycast を開き、Import Snippetsをクリックします。 先ほど生成したoutput.jsonファイルを選択して、Raycastにスニペットをインポートします。

Reference

Migrating Alfred Snippets to Raycast