メインコンテンツまでスキップ

· 約4分
wen

背景

在使用 Golang 的时候,经常会遇到需要将结构体转换为 JSON 的情况,

但是在转换的时候,JSON 的字段顺序并不是我们想要的,这时候就需要我们自己来指定 JSON 的字段顺序。

解决方案

一个比较简单的方案是利用结构体的 tag 来指定 JSON 的字段顺序,

然后在转换的时候,将结构体的字段按照 tag 中的顺序进行排序。

type User struct {
Name string `json:"name,order:2"`
Age int `json:"age,order:1"`
}

代码实现

package main

import (
"encoding/json"
"fmt"
"reflect"
"sort"
"strconv"
"strings"

//orderedmap "github.com/wk8/go-ordered-map/v2"
"github.com/iancoleman/orderedmap"
)

type User struct {
Name string `json:"name,order:3"`
Age int `json:"age,order:2"`
Score int `json:"score,order:1"`
}

type Address struct {
City string `json:"city,order:10"`
Street string `json:"street,order:9"`
ZipCode string `json:"zip_code,order:8"`
}

func main() {
user := User{
Name: "Wen",
Age: 30,
Score: 100,
}
address := Address{
City: "Hangzhou",
Street: "XiHuDaDao",
ZipCode: "10001",
}

// User構造体を指定した順序でJSONに変換
userJSON, err := MarshalJSONWithOrder(user)
if err != nil {
fmt.Println("Error:", err)
return
}
fmt.Println("User JSON:", string(userJSON))

// Address構造体を指定した順序でJSONに変換
addressJSON, err := MarshalJSONWithOrder(address)
if err != nil {
fmt.Println("Error:", err)
return
}

fmt.Println("Address JSON:", string(addressJSON))
}

// MarshalJSONWithOrder は構造体を指定した順序でJSONに変換する
// 構造体での指定方法: `json:"{struct field name},order:{integer}"`
// 指定例: `json:"name,order:10"`
func MarshalJSONWithOrder(obj interface{}) ([]byte, error) {
val := reflect.ValueOf(obj)
typ := reflect.TypeOf(obj)

// ソート用のスライス
var fields []fieldWithOrder

// フィールドの数だけループ
for i := 0; i < val.NumField(); i++ {
fieldName := typ.Field(i).Name

order := getTagValue(typ.Field(i), "json", "order")
fields = append(fields, fieldWithOrder{
Name: fieldName,
Order: order,
})
}

// フィールドのソート
sort.Slice(fields, func(i, j int) bool {
return fields[i].Order < fields[j].Order
})

// ソート後の順序に従ってJSONを生成
//result := orderedmap.New[string, any]()
result := orderedmap.New()
for _, f := range fields {
//result[f.Name] = val.FieldByName(f.Name).Interface()
result.Set(f.Name, val.FieldByName(f.Name).Interface())
}

// マーシャリング
return json.Marshal(result)
}

// getTagValue は指定されたフィールドの指定されたタグの値を取得する
func getTagValue(field reflect.StructField, tag string, tagField string) int {
tagValue, _ := field.Tag.Lookup(tag)

// Split the tag string by ","
tagParts := strings.Split(tagValue, ",")

// Iterate through the tag parts to find the "order" value
res := -1
for _, part := range tagParts {
// Check if the part starts with "order:"
prefix := fmt.Sprintf("%s:", tagField)
if strings.HasPrefix(part, prefix) {
// Extract the numeric value after "order:"
orderStr := strings.TrimPrefix(part, prefix)
order, err := strconv.Atoi(orderStr)
if err == nil {
res = order
}
}
}

return res
}

// fieldWithOrder はソート用の構造体
type fieldWithOrder struct {
Name string
Order int
}

NOTE

  • Ordered Map 的使用

    Golang 中的 map 是无序的,如果需要有序的 map, 可以使用 wk8/go-ordered-map 或者 iancoleman/orderedmap。 由于后者的性能似乎比较好,代码中采用的是后者。

  • ChatGPT 的使用

    代码大部分是用 ChatGPT 生成的,但是生成的代码中有几个问题,例如上面的 Ordered Map,我尝试让 ChatGPT 修改了几次,都没有成功。 最后还是自己手动修改了代码。

    感觉 ChatGPT 对于代码的细节部分的理解还有待改善,而且有时候还胡说八道(现阶段生成式 AI 的通病)。

· 約5分
wen

背景

Docusaurus 默认没有集成评论系统。

在之前的博客中用过 Giscus ,

它是一个基于 GitHub Discussions 的评论系统,可以很方便地集成到 GitHub Pages、VuePress、Docusaurus 等静态网站生成器中。

这次打算把它添加到 Docusaurus。

ヒント

如果不想依存 Github 的服务,可以开卡 Waline 评论系统,可以添加自己的后端服务。

准备工作

ヒント

可以点击流程图中带下划线的 node 跳转到相关页面

步骤

  • 流程图

1. 配置 Giscus

Giscus 的网站上配置你的评论系统,并复制你的配置代码(高亮部分会在步骤 3 中用到)。

giscus config
<script src="https://giscus.app/client.js"
data-repo="your_org_name/your-repo"
data-repo-id="your-repo-id"
data-category="Announcements"
data-category-id="your-category-id"
... // other options
async>
</script>

2. 创建评论组件

2.1. 安装依赖

npm install @giscus/react mitt

# or
yarn add @giscus/react mitt

2.2. 创建组件

点击查看代码
src/components/GiscusComments/index.tsx
import React from "react";
import { useThemeConfig, useColorMode } from "@docusaurus/theme-common";
import useDocusaurusContext from "@docusaurus/useDocusaurusContext";
import { ThemeConfig } from "@docusaurus/preset-classic";
import BrowserOnly from "@docusaurus/BrowserOnly";
import Giscus, { GiscusProps } from "@giscus/react";

interface CustomThemeConfig extends ThemeConfig {
giscus: GiscusProps & { darkTheme: string };
}

const defaultConfig: Partial<GiscusProps> & { darkTheme: string } = {
id: "comments",
mapping: "title",
reactionsEnabled: "1",
emitMetadata: "0",
inputPosition: "top",
lang: "zh-CN",
theme: "light",
darkTheme: "dark",
};

export default function Comment(): JSX.Element {
const themeConfig = useThemeConfig() as CustomThemeConfig;
const { i18n } = useDocusaurusContext();

// merge default config
const giscus = { ...defaultConfig, ...themeConfig.giscus };

if (!giscus.repo || !giscus.repoId || !giscus.categoryId) {
throw new Error(
"You must provide `repo`, `repoId`, and `categoryId` to `themeConfig.giscus`."
);
}

giscus.theme =
useColorMode().colorMode === "dark" ? giscus.darkTheme : giscus.theme;
giscus.lang = i18n.currentLocale;

return (
<BrowserOnly fallback={<div>Loading Comments...</div>}>
{() => <Giscus {...giscus} />}
</BrowserOnly>
);
}

用 Docusaurus 的 swizzle 命令对博客页面对应组件进行修改(添加前面创建的评论组件)。

npm run swizzle @docusaurus/theme-classic BlogPostPage -- --eject --typescript
# or
yarn run swizzle @docusaurus/theme-classic BlogPostPage -- --eject --typescript

以上命令会在 src/theme/BlogPostPage/index.tsx 中生成一些文件,我们只需要修改 index.tsx 文件即可。

以下高亮部分为修改代码:

点击查看代码
src/theme/BlogPostPage/index.tsx
import React, {type ReactNode} from 'react';
import clsx from 'clsx';
import {HtmlClassNameProvider, ThemeClassNames} from '@docusaurus/theme-common';
import {BlogPostProvider, useBlogPost} from '@docusaurus/theme-common/internal';
import BlogLayout from '@theme/BlogLayout';
import BlogPostItem from '@theme/BlogPostItem';
import BlogPostPaginator from '@theme/BlogPostPaginator';
import BlogPostPageMetadata from '@theme/BlogPostPage/Metadata';
import TOC from '@theme/TOC';
import type {Props} from '@theme/BlogPostPage';
import Unlisted from '@theme/Unlisted';
import type {BlogSidebar} from '@docusaurus/plugin-content-blog';
import Comment from '../../components/GiscusComments';

function BlogPostPageContent({
sidebar,
children,
}: {
sidebar: BlogSidebar;
children: ReactNode;
}): JSX.Element {
const {metadata, toc} = useBlogPost();
const {nextItem, prevItem, frontMatter, unlisted} = metadata;
const {
hide_table_of_contents: hideTableOfContents,
toc_min_heading_level: tocMinHeadingLevel,
toc_max_heading_level: tocMaxHeadingLevel,
hide_comment: hideComment,
} = frontMatter;
return (
<BlogLayout
sidebar={sidebar}
toc={
!hideTableOfContents && toc.length > 0 ? (
<TOC
toc={toc}
minHeadingLevel={tocMinHeadingLevel}
maxHeadingLevel={tocMaxHeadingLevel}
/>
) : undefined
}>
{unlisted && <Unlisted />}
<BlogPostItem>{children}</BlogPostItem>

{(nextItem || prevItem) && (
<BlogPostPaginator nextItem={nextItem} prevItem={prevItem} />
)}
{!hideComment && <Comment />}
</BlogLayout>
);
}

...

2.3. 配置 Docusaurus

docusaurus.config.js 中添加配置项:

docusaurus.config.js
module.exports = {
...
themeConfig: {
...
// giscus options
giscus: {
repo: 'your_org/your-blog', // edit this
repoId: 'your_repo_id', // edit this
category: 'Announcements',
categoryId: 'your_category_id', // edit this
}
...
},
...
}

3. 重启 Docusaurus

npm start
# or
yarn start

参考

Docusaurus 添加评论功能

评论服务

· 約3分
wen

背景

最近参与的一个项目,需要经常地进入 AWS ECS 的 Fargate 服务中的容器中。

使用 awscli 的 ECS Exec 可以非常方便地连接到运行中的容器。

img

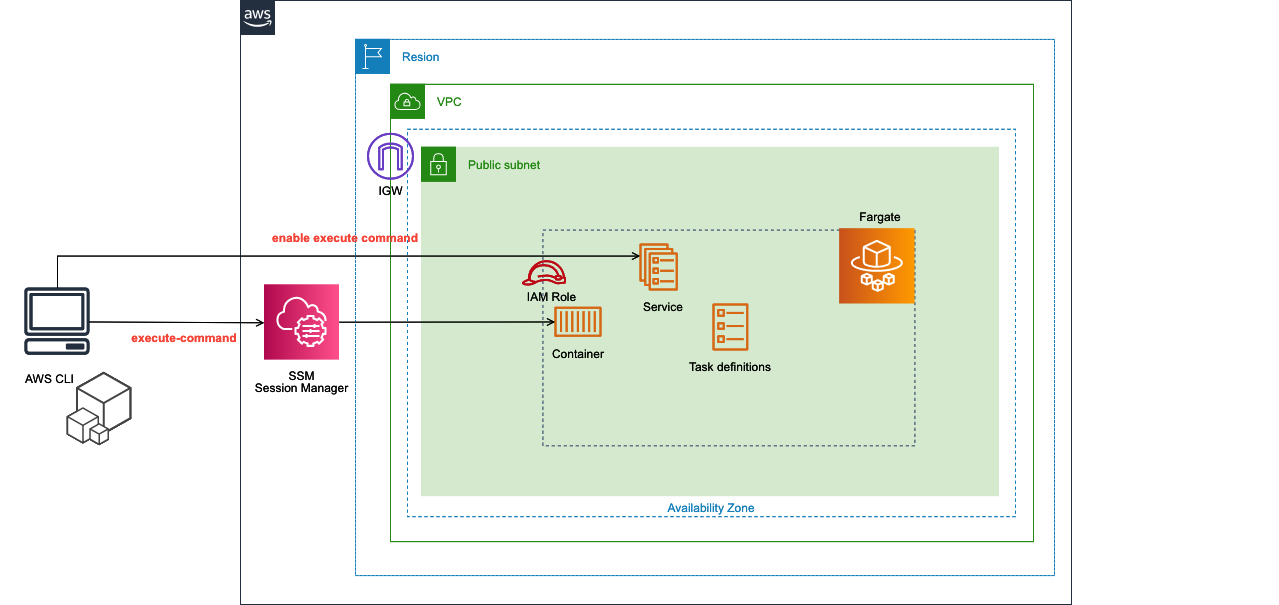
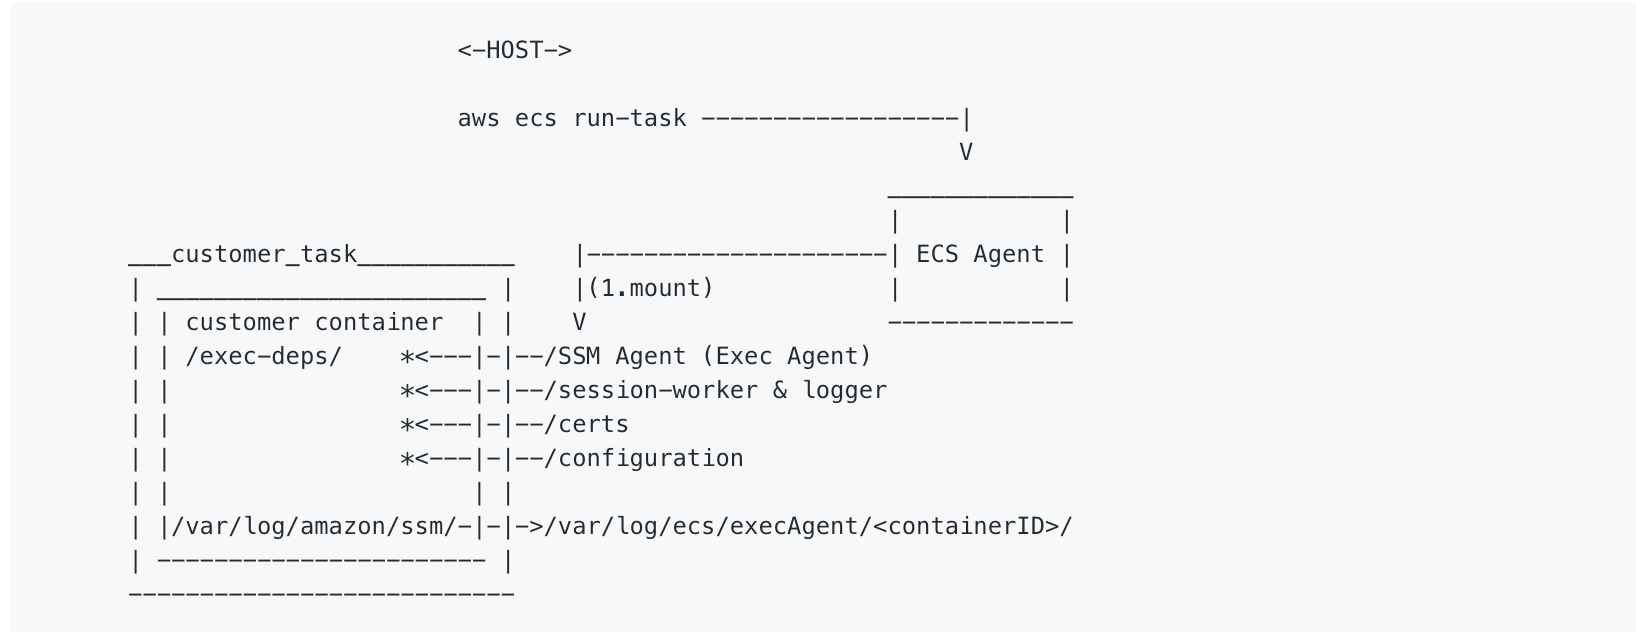
其大概的原理如下图所示:

ECS Exec 把 SSM Agent 绑定到容器,从而可以通过 Systems Manager (SSM) 的会话管理器(Session Manager)访问容器。

img

所以执行该命令,除了需要安装 AWS CLI 之外,还需要安装 session-manager-plugin

对于团队里的一部分成员来说,安装这些工具还是比较麻烦的,所以我写了一个脚本,可以一键连接到 ECS 的容器中。

脚本

connect-to-aws-ecs.sh
#!/bin/bash -eu

# check if aws-cli is installed
if ! type aws >/dev/null 2>&1; then
echo "aws-cli is not installed"
echo "installing aws-cli...."
brew install awscli
echo "aws-cli is installed successfully. please set your credentials by 'aws configure' command"
fi

# check if session-manager-plugin is installed
if ! type session-manager-plugin >/dev/null 2>&1; then
echo "session-manager-plugin is not installed"
echo "installing session-manager-plugin...."
# Download and unzip the Session Manager plugin installer
mkdir -p $HOME/session-manager-plugin/bin
curl "https://s3.amazonaws.com/session-manager-downloads/plugin/latest/mac/sessionmanager-bundle.zip" -o "$HOME/session-manager-plugin/bin/sessionmanager-bundle.zip"
unzip -d $HOME/session-manager-plugin/bin $HOME/session-manager-plugin/bin/sessionmanager-bundle.zip
sudo $HOME/session-manager-plugin/bin/install -i /usr/local/sessionmanagerplugin -b /usr/local/bin/session-manager-plugin

echo "session-manager-plugin is installed successfully."
fi

# set your container name and cluster name
container_name="your-container-name"
cluster_name="your-ecs-cluster-name"

# 执行脚本时,使用 `--profile` 指定的 AWS 配置文件
aws_profile="default"
while [ "$#" -gt 0 ]; do
case "$1" in
--profile=*)
aws_profile="${1#*=}"
;;
*)
# exit when unknown option is specified
echo "未知のオプション: $1"
exit 1
;;
esac
shift
done
echo "aws_profile: $aws_profile"

# fetch task arn
task_arn=$(aws ecs list-tasks \
--profile "$aws_profile" \
--cluster $cluster_name \
--desired-status RUNNING \
--query 'taskArns[0]' \
--output text)

# spit task id from task arn
task_id=$(echo "$task_arn" | awk -F/ '{print $NF}')
echo "task_id: $task_id"

# enter container with session manager
aws ecs execute-command \
--profile "$aws_profile" \
--cluster $cluster_name \
--task "$task_id" \
--container $container_name \
--command "/bin/sh" \
--interactive

使用方法

  1. 将上述脚本保存为 connect-to-aws-ecs.sh 文件
  2. 执行 chmod +x connect-to-aws-ecs.sh 赋予脚本执行权限
  3. 修改脚本中的 container_namecluster_name 为你自己的值
  4. 执行 ./connect-to-aws-ecs.sh 即可连接到 ECS 的容器中

Reference

使用 ECS Exec 访问 Fargate 上的容器

Amazon ECS Exec を使ってみる

· 約1分
wen

背景

当你的博客文章越来越多时,你可能会发现你的博客需要一个 tags 菜单,以便用户可以快速找到他们感兴趣的文章。

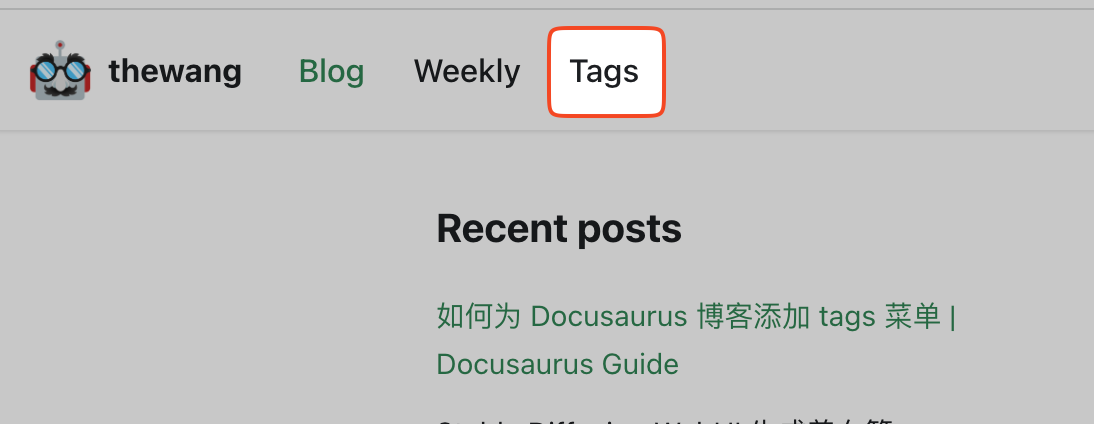
本文将介绍如何为 Docusaurus 博客添加 tags 菜单。

img

添加 tags 菜单

只需要在 docusaurus.config.js 配置文件中,添加如下配置即可:

docusaurus.config.js
      navbar: {
title: 'thewang',
logo: {
alt: 'thewang logo',
src: 'img/logo.png',
},
items: [
{ to: '/blog', label: 'Blog', position: 'left' },
// language dropdown menu
{
type: 'localeDropdown',
position: 'right',
},
...
// tags menu
{
to: '/blog/tags',
label: 'Tags',
position: 'left',
},

· 約4分
wen

Background

在 civitai 上看到 DivineEleganceMix 模型 生成的图片,感觉很美,

就想尝试用 Stable Diffusion WebUI 重现一下。(为了方便描述,以下用 WebUI 代替 Stable Diffusion WebUI )

img

过程

1. 获取 prompt 和参数

Prompts 等参数可以在 这个页面 点击 Copy Generation data 复制得到。

(masterpiece, best quality:1.2), (face focus:1.4), back focus, from behind, blonde hair, long hair, high ponytail, long ponytail, red eyes, long eyelashes, thick eyelashes, looking at viewer, red dress, backless dress, gold trim dress, puffy sleeves, juliet sleeves, long sleeves, red sleeves, (black background:1.2), light particles, blurry, bloom, shiny hair, <lora:Add Detail:0.5>
Negative prompt: (EasyNegative:0.8), (worst quality, low quality:1.2),
(from below:1.2), (ass:1.2), collar, tight, skin tight, impossible clothes, bangs, off shoulder, frills, white sleeves, red background, yellow sleeves,
Steps: 30, VAE: kl-f8-anime2.vae.pt, Size: 512x768, Seed: 3842746991, Model: DivineEleganceMix8, "Module: canny, Sampler: Euler a, VAE hash: df3c506e51, CFG scale: 8, Clip skip: 2, Model hash: 4dbe20030f, ADetailer model: face_yolov8n.pt, ADetailer steps: 30, ADetailer sampler: Euler a, ADetailer version: 23.10.1, Denoising strength: 0.3, ADetailer CFG scale: 8.0, ADetailer CLIP skip: 2, ADetailer mask blur: 16, ADetailer confidence: 0.3, ADetailer dilate/erode: 32, ADetailer inpaint width: 768, ADetailer inpaint height: 768, ADetailer inpaint padding: 32, ADetailer mask merge/invert: Merge, ADetailer denoising strength: 0.3, ADetailer use separate steps: True, ADetailer inpaint only masked: True, ADetailer use separate sampler: True, ADetailer use separate CFG scale: True, ADetailer use separate CLIP skip: True, ADetailer use inpaint width/height: True

2. 安装插件

Generation data 中提到了 VAE: kl-f8-anime2.vae.ptAdetailer 插件,需要先安装。

2.1 安装 VAE:kl-f8-anime2.vae.pt

在 HuggingFace 上找到了 kl-f8-anime2.vae.pt , 下载到本地放到 stable-diffusion-webui/models/VAE/ 里面。

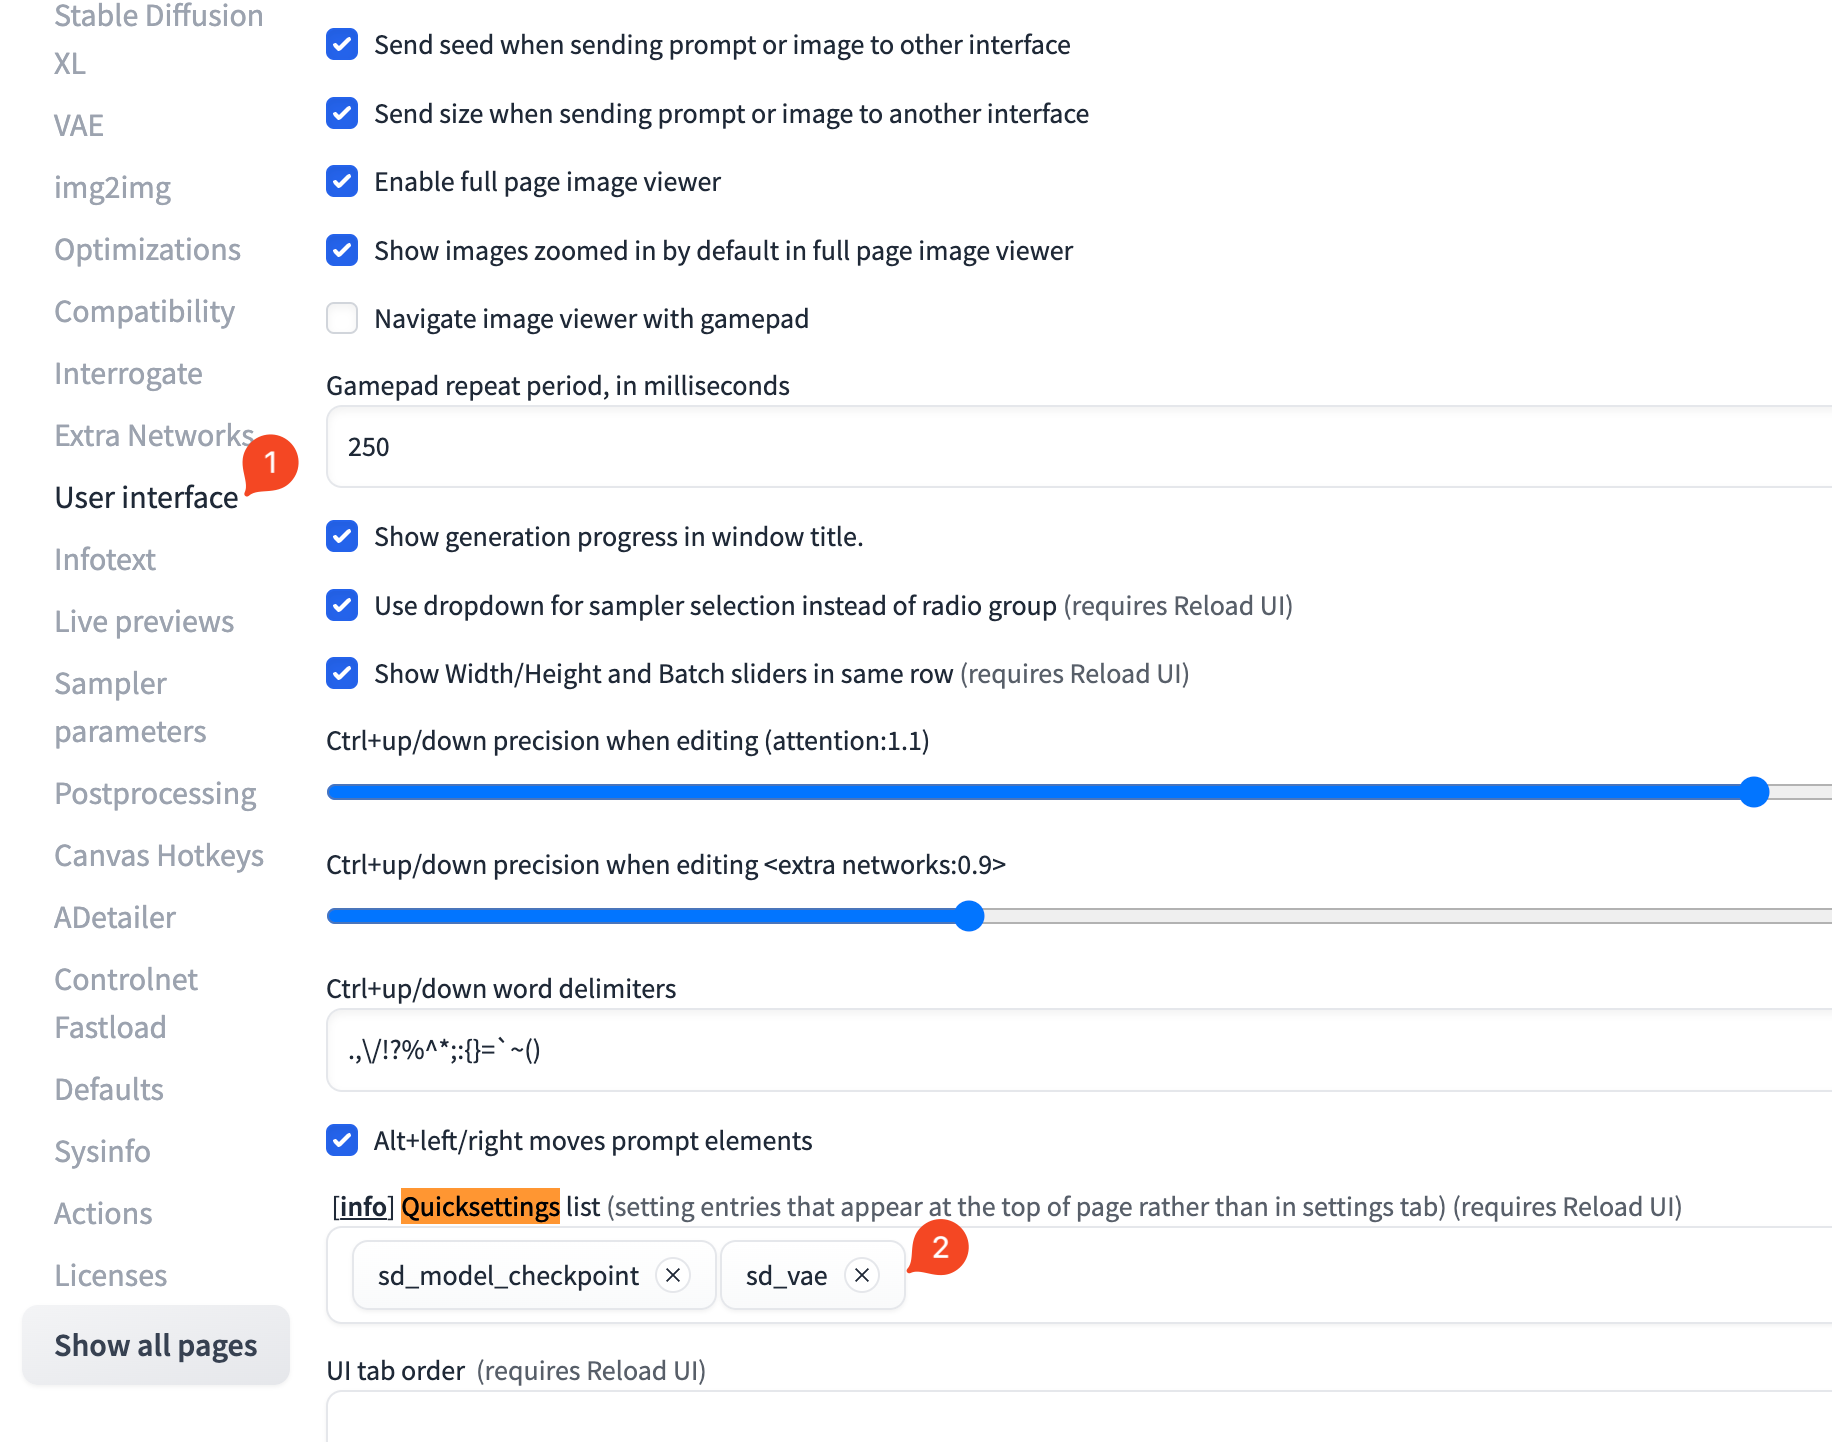
stable-diffusion-webui 默认没有启用 VAE,需要手动启用。

如下图所示,在 stable-diffusion-webui 的 Settings 页面,点击 1️⃣ → 2️⃣ , 添加 sd_vae 后,

点击 Apply settingsReload UI

img

如下图所示,刷新界面后就出现了 1️⃣ SD VAE 选项, 选择我们之前下载的 kl-f8-anime2.ckpt

img

2.2 安装 Adetailer

到 stable-diffusion-webui 的 Extensions 页面,

按照 [Adetailer](https://github.com/Bing-su/adetailer) 的说明安装。

3. 导入参数

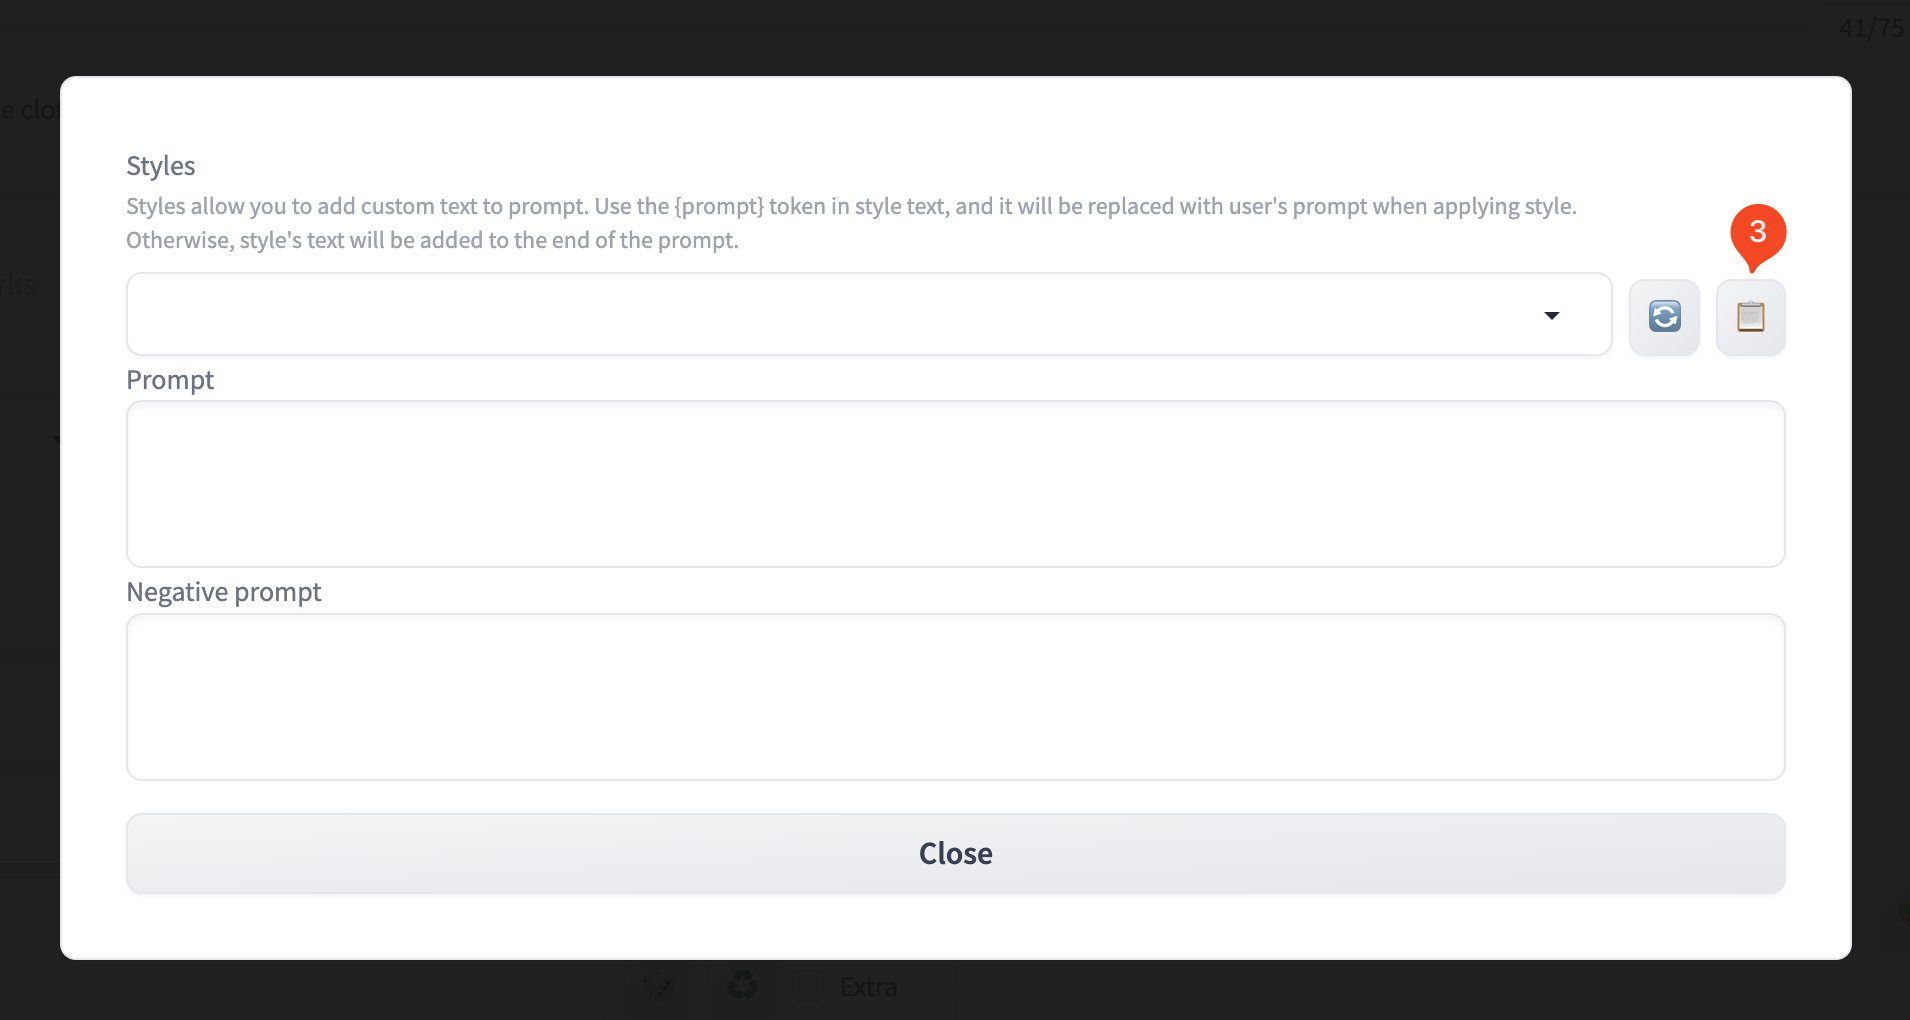
如下图所示,在 WebUItxt2img 页面,点击 1️⃣ 的箭头按钮,粘贴 prompt。

然后点击 2️⃣ 的箭头按钮,在弹出窗口中点击 3️⃣ 按钮粘贴参数。

img img

有些参数好像不能直接粘贴,需要手动修改一下。

比如 Height, ADetailerEnable 选项等。

4. 生成图片

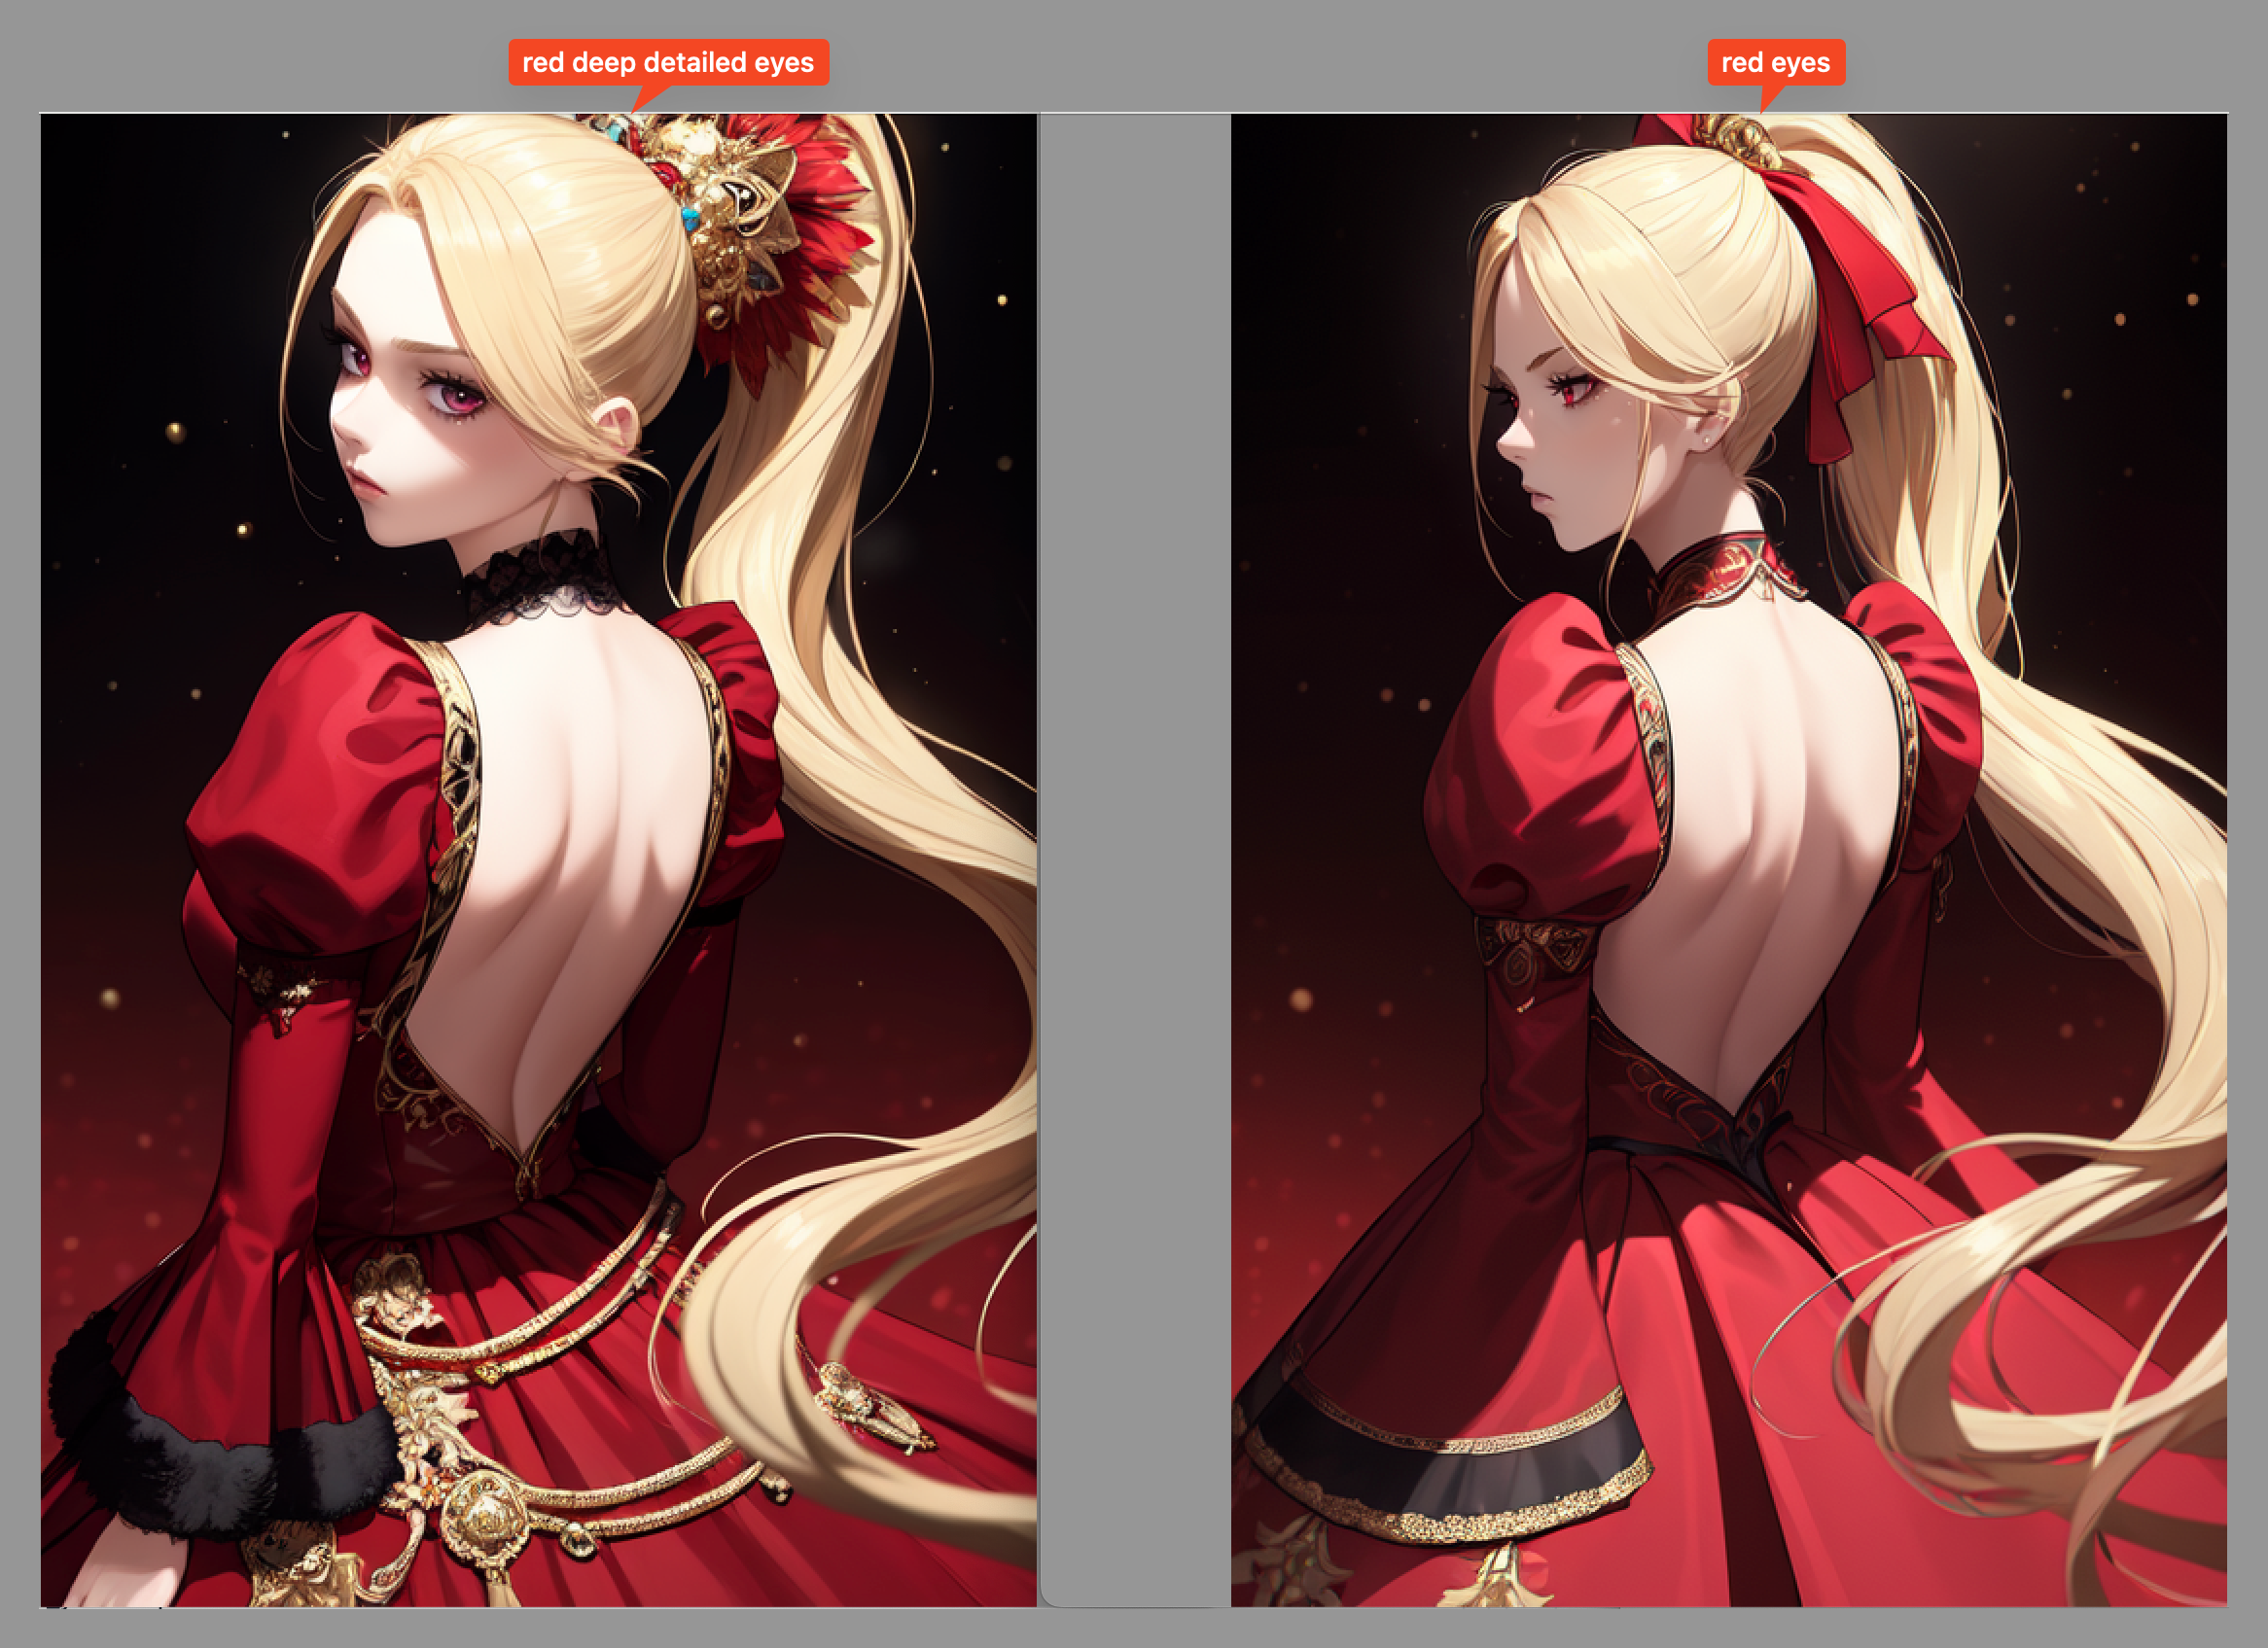
还不错,不过和模型作者的图片好像还是有差距,可能有些设置没改好,有时间再看看。 img

  • 修改了下眼睛部分的 prompt,效果好了点。 img

Appendix

  • ADetailer 的作用是什么?

    • ADetailer 是一个插件,对模型生成的图片中的手部(比如 6 手指问题)、脸部的变形等问题进行处理,使得生成的图片更加真实。
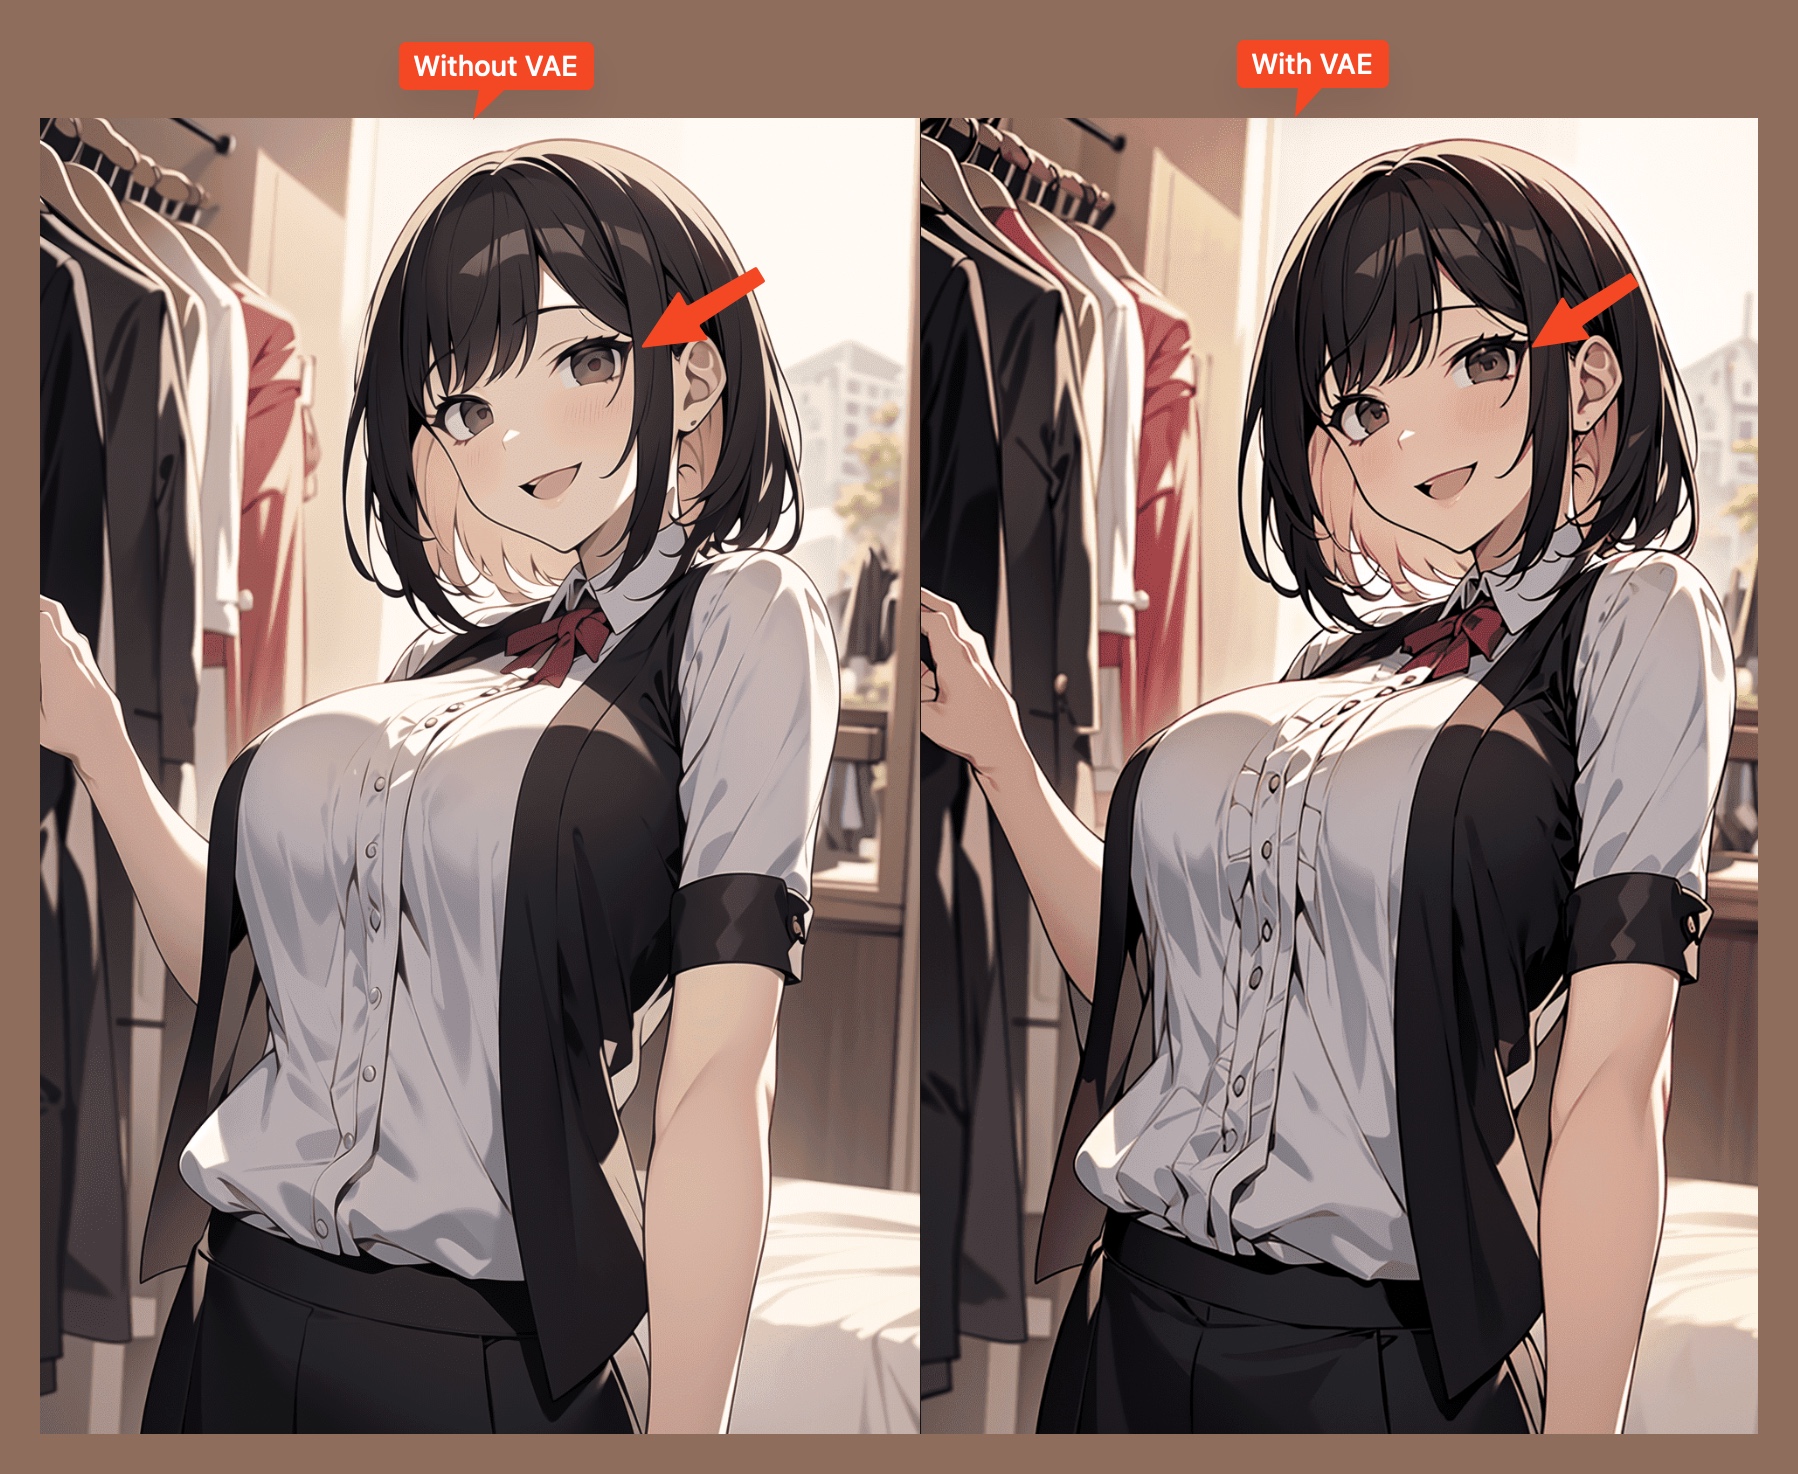
  • 为什么要用 VAE?

Reference

WebUI の拡張機能で 手軽に CivitAI のモデルを利用する

· 約3分
wen

Background

之前试了 Diffusers 等软件,生成的图片都不太理想(甚至难看 😸 ),

有些甚至不能选择模型,UI 也不太好用。

所以这次试试 Stable Diffusion WebUI,据说他的 UI 很好用。

我的环境

我的环境是 MacBook Pro M2 Pro。

$ system_profiler SPHardwareDataType

Hardware Overview:
Model Name: MacBook Pro
Chip: Apple M2 Pro
Total Number of Cores: 12 (8 performance and 4 efficiency)
Memory: 16 GB

安装方法&运行

安装方法很简单,具体看Github 的 readme

brew install cmake protobuf rust [email protected] git wget # install dependencies
git clone https://github.com/AUTOMATIC1111/stable-diffusion-webui # clone the repo
cd stable-diffusion-webui # enter the directory
./weiui.sh # start the app

脚本运行后,会自动打开一个网页。

如果没有自动打开,可以手动打开 http://127.0.0.1:7860/ , 就可以看到界面了。

使用方法

下载模型

ヒント

默认提供一个模型 Stable Diffusion v1-5-pruned-emaonly.safetensors,效果惨不忍睹。

建议直接从 Hugging Face 或者 Civitai 下载。

不相信我提示的可以点击这里看看😄
  • 例 1: Prompts: a little boy playing with a puppy img

  • 例 2: Prompts: 1girl,face,white background img

  • 例 3: Prompts: 1girl,face,white background

  • Negative Prompts: (worst quality:2),(low quality:2),(normal quality:2),lowres,watermark img

我从 Civitai 下载了一个比较有人气的模型 majicMIX realistic, 再用之前的 prompt 试了试,效果比默认的模型好太多了 😄。

生成结果

  • Prompts: 1girl,face,white background img

  • Prompts: 1girl,face,white background

    Negative Prompts: (worst quality:2),(low quality:2),(normal quality:2),lowres,watermark img

ヒント

Negative Prompts : 用来指定不想要的图片特征,比如 lowres 代表不想要低分辨率的图片。

Reference

Stable Diffusion モデルの探し方

Stable Diffusion WebUI のおすすめモデル 10 選をご紹介!導入方法も解説

· 約1分
wen

背景

刚加入新公司,接手了一个项目,什么资料也没有。 🥲

想要了解这个项目,一个比较直接的办法就是先看看数据库的 ER 图,手动画图太麻烦,

Google 了下, 发现可以用 JetBrainsDataGrip 来导出 ER 图。

步骤

1. Connect to database

1️⃣. Click + button in the left panel

2️⃣. Select Data Source -> MySQL(or other database)

3️⃣. Fill in the your database information

img

2. Show diagram

1️⃣. Right click the database you want to show

2️⃣ 3️⃣. Select Diagram -> Show Diagram

4️⃣. Then you will see the ER diagram

img

扩展

DataGrip 还有很多功能,比如可以直接在里面写 SQL,还可以直接导出 SQL Script,等等。

点击这里查看更多功能。

· 約1分
wen

背景

Diffuses Apphuggingface 推出的一个 App。

结论

以下基于 Version 1.1 (20230222.140932) 进行介绍.

先说结论,让它画猫画狗可能还行,画人就惨不忍睹了。😄

而且除了默认提供的 5 个模型(选择后会自动下载),不能加载其他模型。

一些生成结果

画狗

  • Prompt: Labrador in the style of Vermeer
  • Model: stabilityai/stable-diffusion-2-base

img

画人

危険

下面的图片有点恐怖哦。。。 😨 而且我都是我重复多次,选相对好的结果。

  • Prompt: Japanese beauty
  • Model: stabilityai/stable-diffusion-2-base

img

  • Prompt: Chinese beauty
  • Model: stabilityai/stable-diffusion-2-base

img

  • Prompt: Korean beauty
  • Model: stabilityai/stable-diffusion-2-base

img

  • Prompt: American beauty
  • Model: stabilityai/stable-diffusion-2-base

img

· 約2分
wen

Update Docusaurus to v3

Docuaurus v3 已经发布了, 官方提供了升级指南, 这里还是记录一下升级过程吧。😄

升级依赖

  • docusaurus.config.js
docusaurus.config.js

-const lightCodeTheme = require('prism-react-renderer/themes/github');
-const darkCodeTheme = require('prism-react-renderer/themes/dracula');
+const { themes } = require('prism-react-renderer');
+const lightTheme = themes.github;
+const darkTheme = themes.dracula;

prism: {
- theme: lightCodeTheme,
- darkTheme: darkCodeTheme,
+ theme: lightTheme,
+ darkTheme: darkTheme,
},

  • package.json
package.json
   "dependencies": {
- "@docusaurus/core": "2.4.3",
- "@docusaurus/preset-classic": "2.4.3",
- "@docusaurus/theme-mermaid": "^2.4.3",
- "@mdx-js/react": "^1.6.22",
+ "@docusaurus/core": "3.0.0",
+ "@docusaurus/preset-classic": "3.0.0",
+ "@docusaurus/theme-mermaid": "^3.0.0",
+ "@mdx-js/react": "^3.0.0",
"clsx": "^1.2.1",
- "prism-react-renderer": "^1.3.5",
- "react": "^17.0.2",
- "react-dom": "^17.0.2"
+ "prism-react-renderer": "^2.1.0",
+ "react": "^18.2.0",
+ "react-dom": "^18.2.0"
},
"devDependencies": {
- "@docusaurus/module-type-aliases": "2.4.3"
+ "@docusaurus/module-type-aliases": "3.0.0",
+ "@docusaurus/types": "3.0.0"
},


"engines": {
- "node": ">=16.14"
+ "node": ">=18.0"
}

重新安装依赖

删除 node_modules 目录和 package-lock.json 文件,然后重新安装依赖。

npm install

检查 md/mdx 文件

  • 官方提供了工具来检查 md/mdx 文件中的 frontmatter 是否符合 MDX v3。
npx docusaurus-mdx-checker

你可能需要修改一些文件,比如我升级到 v3 后,就遇到了一个格式问题:

  • 修改前
<details><summary>xxx</summary>
...
</details>
  • 修改后
<details>
<summary>xxx</summary>
...
</details>

· 約2分
wen

git commit --amend --no-edit

当你觉得你已经把某个 issue 修改好了,可实际上你没能一次性修改好(也许只是有些 typo);

OR

当你确实已经把某个 issue 修改好了,可你忘记了 add 一些文件时,

你可以这么做:

git add .
git commit --amend --no-edit # --no-edit 选项表示不修改 commit message。
git push -f # 如果你已经 push 过了,需要添加 -f 来强制 push。
注記

其实我就是为了体验下 mermaidjs 的 gitGraph 功能而写的这篇文章 😄。

BTW, gitGraph 的 commit message 默认是 rotated 的。

如果你想要更改成水平的,需要在 docusaurus.config.js 中添加如下配置:

+      mermaid: {
+ options: {
+ gitGraph: { rotateCommitLabel: false },
+ },
+ },